Hudson을 이용한 빌드와 테스트의 자동화


2007-04-04
BEA Systems Korea
Sr consultant Byungwook Cho (bcho@bea.com)

Continuous Integration(점진적 통합,이하 CI)이란, 개발자가 각각 개발한 소스코드를 모아서 한꺼번에 빌드하는 통합 빌드의 과정을 특정 시점이 아니라 매일이나 매주와 같이 아주 잦은 주기로 수행함으로써 통합에서 발생하는 오류와 시간을 줄이기 위한 기법이다.
Extreme Programming Community (XP)에서 애자일 방법론의 일부로 Kent Beck에 의해서 고안된 방법으로 다음과 같은 특징을 가지고 있다.

1. CI의 특징
(1) 소스코드 일관성 유지
CI툴을 설정하기 위해서는 기본적으로 소스 관리 시스템이 필요하다.
대표적인 소스 관리 시스템은 Subversion,CVS,Perforce등이 있다.
CI툴은 이 소스 관리 시스템으로부터 프로젝트 소스의 메인 브랜치(trunk 라고도 한다.) 코드를 Check out 받아서 빌드를 수행한다.

(2) 자동 빌드
소스 코드에 대한 빌드는 CI툴에 의해서 자동적으로 이루어 져야 한다.
빌드가 이루어지는 시점을 정하는 방법이 두가지가 있는데 다음과 같다.

1) 커밋에 따른 자동 빌드
다른 방법으로는 소스코드가 소스 관리 시스템에 커밋이 되었을 때 마다 CI툴이 이를 감지 하고 자동으로 빌드를 수행하도록 설정할 수 있다.
이렇게 설정할 경우 소스 코드의 변경이 있을 때 마다 빌드 작업을 수행하기 때문에 소스 관리 시스템에 저장된 소스 코드에 대한 무결성을 보장하기는 매우 좋지만, 빌드 시간이 길 경우 빌드가 적체 되는 현상이 발생할 수 있다. 
(일반적으로 대규모 애플리케이션의 FULL 빌드는 길게는 2~3시간 까지 소요될 수 있다.) 그래서 이 방법은 빌드 시간이 오래 걸리는 경우나 커밋이 자주 발생하는 경우에는 적절하지 않다.

2) 시간 간격에 의한 빌드
일정 시간 간격을 정해서 빌드를 하는 방법이다. 매일 5시에 빌드를 한다. 또는 매주 금요일 저녁 5시에 빌드를 한다는 것과 같이 주기를 정할 수 있다. 빌드 스케쥴이 미리 정해져있기 때문에 개발자들이 커밋에 대한 스케쥴을 관리할 수 있고 빌드 시간이 오래걸리는 대규모 빌드에도 적정하다.
 빌드 시간을 정할 때 중요한 점은 가급적이면 퇴근 시간 1~2시간 전으로 개발자들이 퇴근하기 전 시간으로 여유를 두는 것이 좋다.
이후 빌드가 깨진 경우는 컴파일이 실패하였거나 테스트가 통과하지 못하였을 경우인데 이때 소스 관리 시스템에 저장된 코드는 문제가 있는 코드이다. (빌드가 깨졌기 때문에) 이 코드들을 다른 개발자가 체크아웃 받아서 개발을 했을 때 잘못된 코드로 인해서 잘못된 개발 방향으로 갈 수 가 있기 때문에 빌드가 깨졌을 때는 가급적 빨리 문제를 수정하여 빌드를 정상화 시키고 소스 관리 시스템에 저장되 코드의 무결성을 회복하거나 빌드가 성공한 전버전으로 BACK(Revert) 해서 무결성이 보장된 코드내에서 작업하도록 한다. Revert를 위해서는 소스 관리 시스템에 빌드때마다 Tagging을 해서 무결성이 보장된 버전에 대한 History를 관리해야 한다.

Silent period에 대해서
CI툴에서는 소스 관리 시스템으로부터 소스를 체크아웃 또는 업데이트 받을 때 Silent Period라는 옵션을 제공한다.
개발자가 소스를 커밋하고 있을 때 커밋이 완료되지 않은 상태에서 CI툴이 소스를 체크아웃하게 되면 불완전한 코드가 내려와서 빌드가 망가질 수 있다. 이를 방지하는 옵션이 Silent Period인데, 커밋이 있은후 일정 시간동안 소스 관리 시스템에 변화가 없을 때 CI툴이 체크아웃을 받아서 불완전한 코드를 내려 받을 수 있는 가능성을 최소화 하는 것이다.

이렇게 자동 빌드를 하면서 얻을 수 있는 이점은, 주기적인 빌드를 통해서 소스코드의 무결성 관리와 빅뱅방식의 통합에서 올 수 있는 리스크를 개발과정 전반으로 분산할 수 있다.

(3) 자동 테스팅
빌드 과정에서 테스트를 포함할 수 있는데, 주기적인 빌드 과정에 테스트를 포함해서 자동 빌드를 통한 Syntax에 대한 검증과 더불어 테스팅을 통한 기능과 비기능적(성능등)에 대한 요건을 매번 검증함으로써 코드의 품질에 대한 무결성을 함께 유지한다.

(4) 일일 체크아웃과 빌드
개발자가 출근후 소스 관리 시스템에서 최신 코드를 내려받고, 출근전에 현재 코드를 소스 관리 시스템에 저장함으로써 소스 코드에 대한 무결성을 유지한다.

예를 들어 개발자 A와 개발자 B가 같이 개발을 할 때, 개발자 A가 작성한 모듈을 개발자 B가 참고해서 사용한다고 하자, 이런 경우 개발자 A가 임의로 컴포넌트에 대한 작동 방식이나 인터페이스를 변경했을 때 일일 체크아웃과 빌드를 하면 개발자 A의 모듈을 사용하는 개발자 B의 모듈의 컴파일 오류나 또는 테스트 오류가 발생할 것이고 코드 변경으로 인한 임팩트를 빠르게 발견하여 수정할 수 있다.
그러나 통합 빌드의 과정이 일일이 아니거나 일일 체크아웃 빌드를 하지 않고 일주일이나 한달 단위로 할 경우 일주일동안 개발자 B는 잘못된 코드를 양산할것이고, 그 만큼의 시간 낭비가 발생한다.

일일 체크아웃과 빌드는 이를 방지해주는 역할을 한다.

2.CI 프로세스

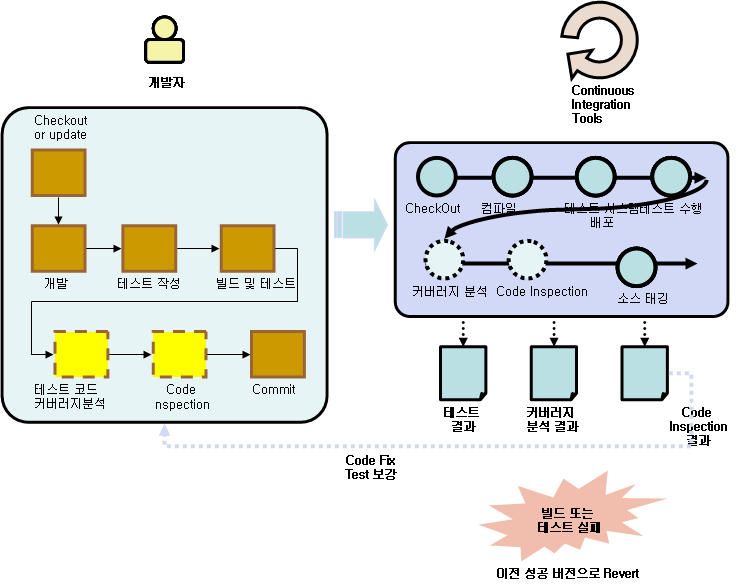
CI에 대한 프로세스를 정리해보면 다음과 같다.
 

사용자 삽입 이미지

<그림. Continous Integration Process >


(1) 개발자
1) 개발자는 아침에 출근해서 소스 관리 시스템으로부터 최신 코드를 Checkout 또는 update받는다.
2) 코드를 가지고 개발을 수행하고 테스트를 작성한다.
3) 로컬에서 빌드 및 테스트를 진행한다.
4) 테스트과정에서 커버러지분석과 Code Inspection을 수행한다. (Optional)
 커버리지 분석
커버러지 분석은 테스트의 대상중에 테스트에 해당하는 부분중에 어느 부분이 테스트가 수행이 되었는지를 체크하는 과정이다. 개발 과정에서의 테스트 커버러지 분석은 일반적으로 코드 커버러지로 분석한다.
코드 커버러지란 테스트가 전체 소스 코드중 어느부분을 수행했는지를 검토하는 것이다.
코드 커버러지를 측정할 때 가장 중요한 것은 목표 커버러지율을 결정하는 것이다. 코드 100%를 테스트하는 것이 좋겠지만, Exception,If 문에 대해서 100% 테스트가 불가능하다. 또한 Setter와 Getter만 있는 ValueObject의 경우 테스트를 작성하는 것도 쉽고 테스트 자체가 의미가 없나 Coverate rate는 많이 올릴 수 있다. 만약 커버러지율을 강제적으로 높이고자 하면 개발팀에서 VO등 테스트가 필요하지 않고 테스트가 쉬운곳에만 테스트를 집중할 수 있기 때문에 컴포넌트의 우선순위를 정해서 중요한 컴포넌트에 대해서 커버러지를 관리하는 것이 필요하다.
커버러지율은 잘 만든 테스트라도 50~70% 내외이고, 고 가용성 시스템도 80%를 넘기 힘들기 때문에, 컴포넌트의 중요도별로 목표 커버러지율을 융통성 있게 결정하는 것이 필요하다.
대표적인 오픈소스 도구로는 EMMA와 Cobertura등이 있고, 상용 도구로는 Atlassian社의 Clover등이 있다.
 Code Inspection
Code Inspection이란, 완성된 코드에 대한 검토를 통해서 코드상에 존재하고 있는 잠재적인 문제를 발견하는 과정이다. 흔히 “정적 분석” 이라는 이름으로도 불리는데, 이 과정에서 Deadlock에 대한 검출 Lock contention과 같은 병목 구간에 대한 검출 Memory Leak이나 Connection Leak과 같은 자원 누수에 대한 검출과 코딩 스타일 (변수명이나 메서드명 규칙등)에 대한 가이드를 수행한다.
보통 이런 도구들은 룰 셋을 추가하여 Inspection을 각 팀의 스타일에 맞춰서 Customizing할 수 있으며 대표적인 오픈 소스 도구로는 PMD, FindBugs등이 있다.

5) 완료된 코드를 소스 관리 시스템에 저장한다.
완료된 코드와 테스트를 소스 관리 시스템에 커밋한다.

(2) CI Tools

1) 체크아웃
CI Tools는 정해진 시간이나 소스가 커밋이 되었을 때 등 정책에 따라서 빌드를 시작한다. 먼저 소스 코드를 체크아웃 받는다.
2) 컴파일
체크아웃 받은 코드에 내장되어 있는 빌드 스크립트를 기동하여 컴파일을 수행한다.
3) 배포
컴파일이 완료된 코드를 테스트 서버에 배포한다.
4) 테스트 수행
체크아웃 받은 코드내에 있는 테스트 코드들을 수행하고 리포팅을 한다.
5) 커버러지 분석
테스트 과정중에 코드 커버러지를 수행한다.
커버러지의 기본 원리는 커버러지 분석 대상이 되는 코드내에 커버러지 분석 코드를 삽입하여 테스트가 완료된 후에 그 결과를 수집하여 분석을 하는데 분석 코드를 삽입하는 과정을 Code Instrument라고 한다. Instrumented된 코드는 커버러지 분석 기능으로 인해서 성능 저하를 유발할 수 있기 때문에 만약에 테스트 과정에 성능이나 응답시간에 관련된 테스트가 있을때는 커버러지 분석을 위해서 테스트를 마친후에 Instrument를 다시하여 3),4) 과정을 다시 거쳐서 커버러지 분석을 해야 테스트 과정에서 성능에 대한 요소를 올바르게 추출할 수 있다.
6) Code Inspection
다음으로 Code Inspection을 수행하고 리포트를 생성한다.
7) 소스 태깅
1)~6) 과정이 정상적으로 수행되었을 때, 현재 소스 관리 시스템에 저장된 버전을 안정적인 버전으로 판단하고 소스 관리 시스템에 현재 버전에 대한 이미지를 저장하기 위해서 Tagging을 수행하여 현재 버전을 저장해놓는다. 
8) Reverse (Optional)
만약에 빌드나 테스트가 실패하였을때는 이전에 성공한 빌드 버전으로 소스를 롤백하고, 실패의 원인을 파악한후에 다시 커밋한다. 
이것은 소스 관리 시스템에 저장된 소스는 문제가 없는 소스를 항상 유지하여 개발자들이 문제가 없는 소스로 작업을 할 수 있게 보장해주며, 릴리즈가 필요한 시기에 언제든지 릴리즈가 가능하도록 지원해준다.
9) 결과 분석
빌드와 테스트가 완료된 후에 테스트 결과서를 통해서 문제가 있는 테스트를 개발자가 수정하도록 하고, Code Inspection결과를 PM이 검토하여 담당 개발자가 수정하도록 한다. 
다음으로 Coverage 분석 결과를 통해서 테스트가 부족한 부분은 PM이 담당 개발자에게 지시항 테스트를 보강하도록 한다.

3.Hudson 설치

(1) Hudson의 설치 및 기동


1) https://hudson.dev.java.net/ 에서 hudson을 다운로드 받는다.
2) 다운로드 받은 Hudson.war를 Apache Tomcat에 deploy해서 구동 하거나 도는 java –jar hudson.war로 hudon으르 기동한다. 디폴트로 설치된 hudson은 8080포트를 통해서 접근이 가능하다. (Tomcat을 통해서 설치 하지 않은 경우)

WAS에 인스톨 정보
http://hudson.gotdns.com/wiki/display/HUDSON/Containers

(2) Hudson과 소스 관리 시스템 연동
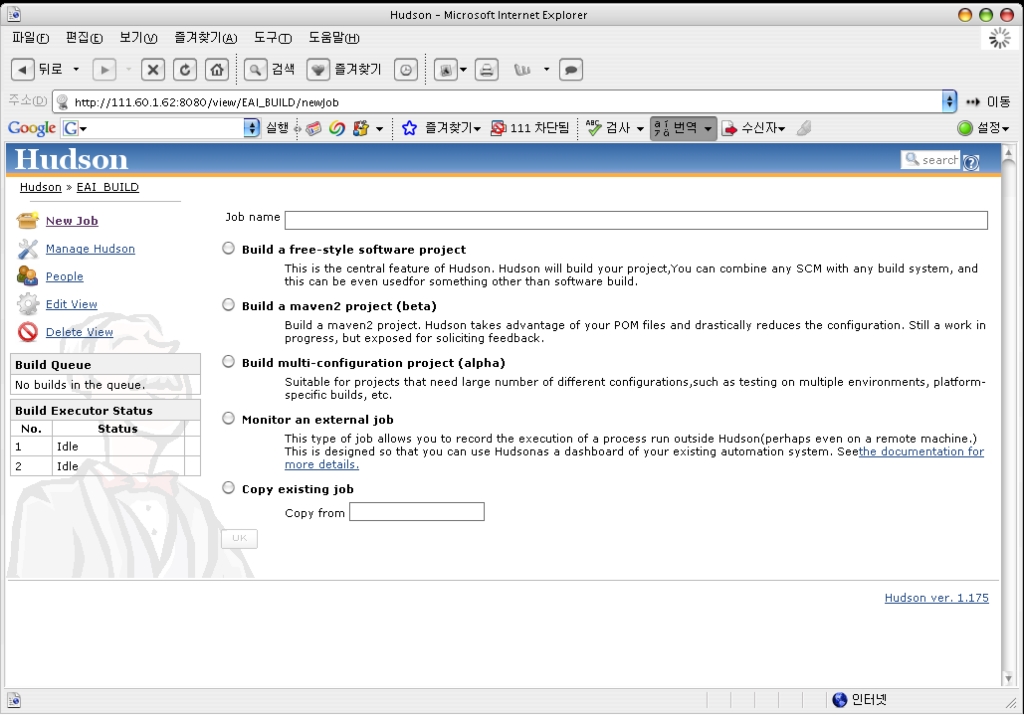
좌측 메뉴에서 “New Job”을 선택하여 새로운 작업을 등록한다.
Job name을 선택하고 “Build a free-style software project”를 선택한다. 아직까지 다른 빌드 선택은 안정화 되어있지 않기 때문에 이 메뉴를 중심으로 설명한다.
 

사용자 삽입 이미지

<그림 1. 새로운 프로젝트의 생성>

(3) 소스 관리 시스템과 연동
Job이 생성되고 나면 초기화면에서 Job을 선택할 수 있다 Job을 선택하면 좌측에 Configure라는 메뉴가 생기는데, 그 안으로 들어가면 Job에 대한 설정을 할 수 있다.

먼저 소스 관리 시스템으로부터 코드를 내려받도록 설정해야 한다.
“Source Code Management”에서 사용하는 소스 관리 시스템을 선택한다.
이 예제에서는 Subversion을 선택한다.
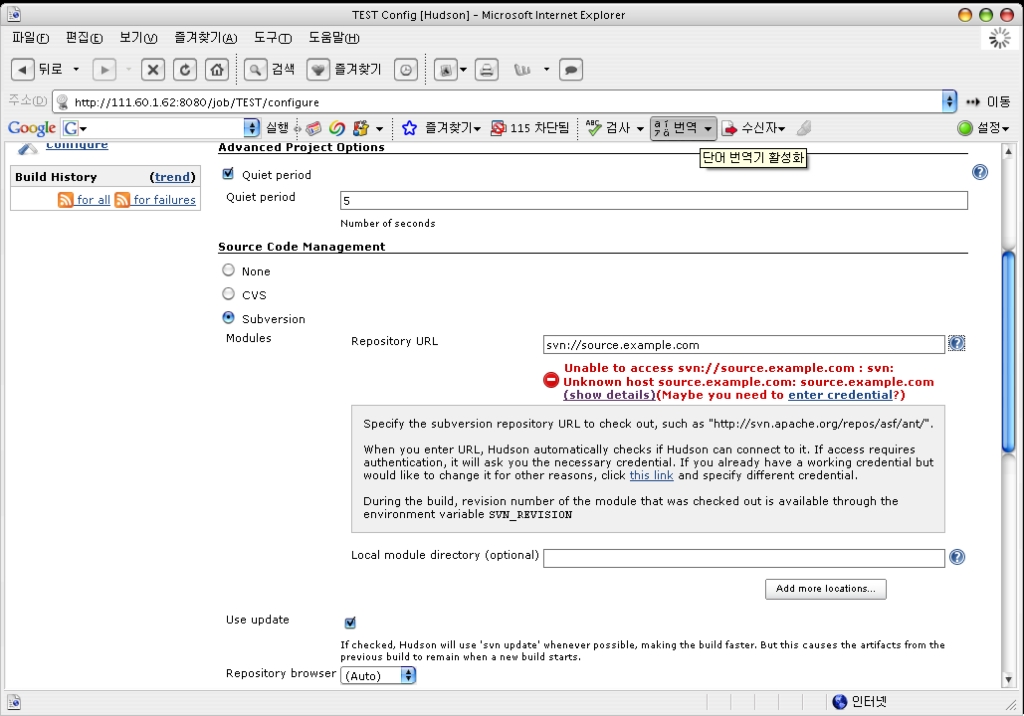
Subversion을 선택한후 Repository URL에 SVN접근 주소를 입력한다. 
svn://source.example.com/trunk 그 아래에 “Local module directory”에 SVN 레파지토리의 하위 디렉토리를 선택한다. “/myproject” 식으로 
이렇게 하면 svn://source.example.com/trunk/myproject 에서 소스 코드를 매번 내려받게 된다. Repository URL과 Location을 지정하면 Hudson이 자동으로 SVN에 접속을 시도해본다. 만약에 id와 passwd가 필요한 경우에는 아래 그림과 같이 “enter credential”이라는 링크가 Repository URL 아래 나타나서 id와 passwd를 입력할 수 있게 한다.
 

사용자 삽입 이미지

<그림 2. SVN 접속 정보 입력>
여기에 소스 관리 시스템 연결에 관련해서 몇가지 옵션을 추가할 수 있다.

 Use Update
소스 관리 시스템에서 소스를 내려받을 때 디폴트가 모든 소스를 매번 다운로드 받는것인데 이런 경우에는 소스양이 많을 경우 다운로드에 많은 시간이 소요되서 전체 빌드 시간이 늘어날 수 있다. 이때 “Use Update”라는 옵션을 사용하면 처음에만 소스 코드를 전체 다운로드 받고, 두번째 부터는 변경된 소스 코드만 다운로드 받기 때문에 소스 코드를 다운 받는 시간을 많이 줄일 수 있다. (svn update와 같은 명령)

 Repository Browser
Repository Browser란 소스 관리 시스템에 저장된 소스의 내용 웹에서 브라우징할 수 있는 도구이다. 도구에 따라서 이전 버전과 변경된 부분에 대한 Diff비교 또는 처음 소스 코드가 생성되었을 때부터 매번 커밋되었을 때 변경 내용에 대한 Revision등에 대한 모든 히스토리를 출력해준다. 이런 기능은 빌드가 깨졌을 때, 바로 빌드 버전에 대한 소스 변경 내용을 추적하여 누가 어떤 코드를 변경하였는지를 추적하여 가능한한 빠른 시간내에 문제를 해결하게 해준다.
이 옵션을 체크해놓으면 빌드가 완료된후 Job의 Changes를 보면 소스 코드가 변경된 부분에 대해서 Repository Browser로 링크가 걸려서 소스를 웹에서 바로 확인하거나 전버전에서 바뀐 부분을 확인할 수 있다.
대표적인 Repository Browser로는 오픈소스 제품인 Sventon과 상용제품인 Fisheye등이 있다.

(4) 빌드 트리거링
다음 설정해야 하는 부분이 Build Triggers 설정이다.
이 설정은 언제 빌드가 돌아야 하는가를 설정하는 부분으로 3가지 옵션을 제공한다.

1) Build after other projects are built
이 옵션에는 다른 Job(Project)의 이름을 인자로 넣는다. 
이렇게 하면 지정된 프로젝트의 빌드가 정상적으로 끝나면 자동으로 이 프로젝트가 Invoke된다. 만약에 빌드만 하는 Job과 테스트만 하는 Job이 있고 테스트는 자주 사용하고 빌드후에 반드시 테스트를 해야할 때, 테스트 Job에서 이 옵션으로 선행작업을 빌드로 해놓으면 빌드를 수행할 때 마다 빌드가 성공하면 테스트를 수행하게 된다. 테스트만 수행하면 빌드와 상관없이 테스트만 수행된다.
이 옵션은 프로젝트 실행의 전후 관계(Chainning)을 하는데 매우 유용하게 사용할 수 있다.

2) Poll SCM
이 옵션을 사용하면 여기에 지정한 주기별로 소스 관리 시스템을 폴링(체크)하여 변경이 있을 경우에만 빌드를 수행한다.
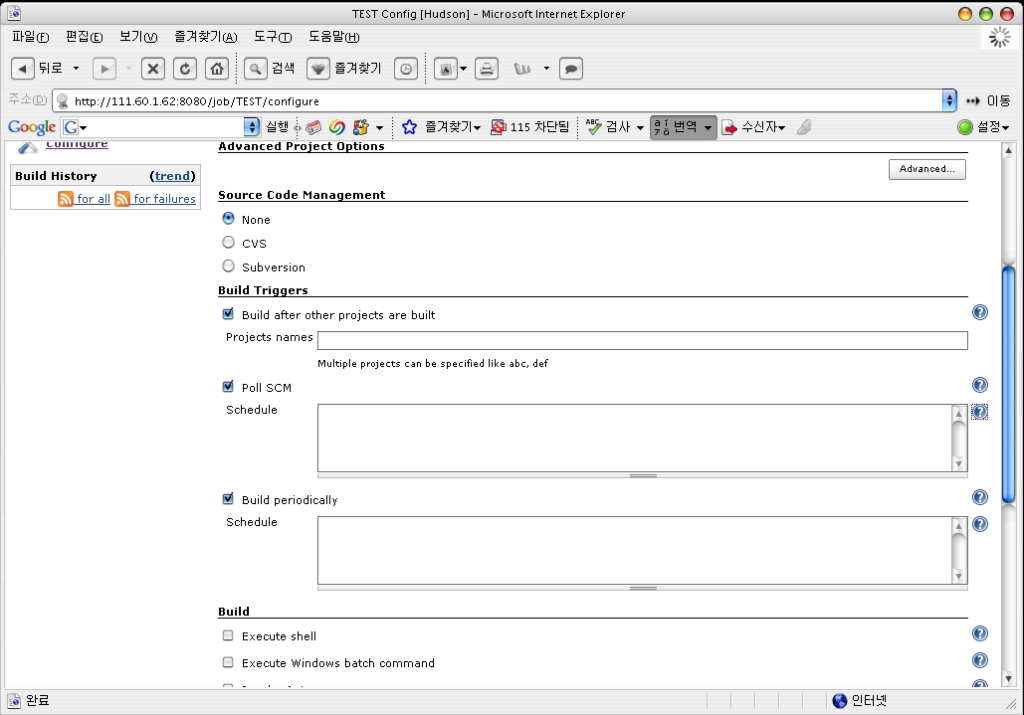
 

사용자 삽입 이미지

<그림 Build Trigger 등록 >

시간 설정 방법은 unix의 crontab 명령과 같은 형식으로 아래와 같은 형식을 사용한다.
분 시간 날짜 월 요일

사용 예는 다음과 같다.
# 매일 12시에 실행
00 12 * * *
# 매주 일요일 1시에 실행
00 01 * * 7
# 매일 12시와 5시에 실행
00 05 * * *
00 12 * * *

3) Build periodically
마지막으로 Build periodically는 정해진 시간 주기별로 소스가 변경과 상관없이 무조건 주기적으로 빌드를 수행하며 Poll SCM과 마찬가지로 crontab과 같은 형식으로 스케쥴을 등록한다.

(5) Build
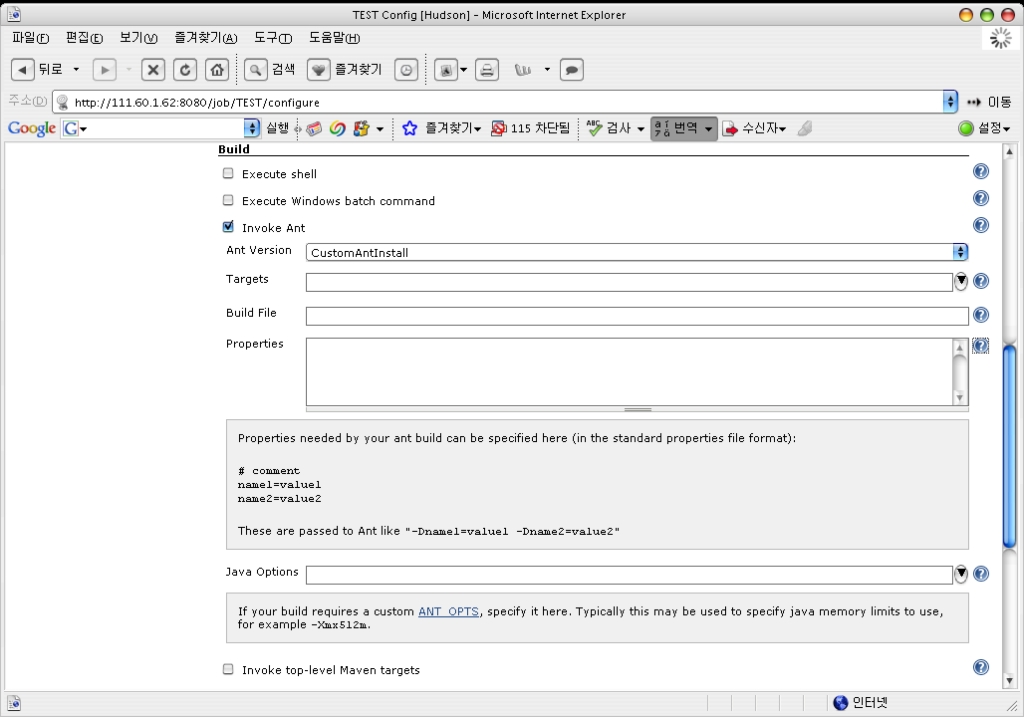
정해진 스케쥴 정책에 따라 빌드 프로세스가 기동되면 실제 빌드를 수행할 빌드 스크립트가 구동되어야 하는데, Hudson에서는 ANT,MAVEN,그리고 Unix/Windows shell을 수행할 수 있도록 되어 있다. 여기서는 ANT 기반으로 설명을 한다.
 

사용자 삽입 이미지

<그림. Invoke ANT 설정 >

Invoke ANT를 선택 하면 다음과 같은 옵션을 선택할 수 있다.

 ANT Version
Hudson 초기화면에서 “Manage Hudson”메뉴로 들어가면 “System configuration” 메뉴에서 여러 개의 ANT_HOME을 등록할 수 있다.
ANT 버전에 따라서 플러그인이 차이가 날 수 도 있고, 프로젝트에 따라서 사용해야 하는 ANT 버전이 틀릴 수 있기 때문에 여러 개의 ANT를 등록할 수 있게 해준다.
예를 들어 프로젝트가 JUnit 3.8대와 JUnit 4.X대로 각각 구현되어 있다면 ANT에 설치되어야 하는 JUnit 라이브러리 버전이 틀리기 때문에 두개의 ANT를 설정해야 할 수 있다. 이런 경우에 “System configuration”에서 ANT를 여러 개 등록해놓고, 이 ANT Version 메뉴에서 필요한 ANT 버전을 선택하면 된다.

 Target
ANT 스크립트의 Target을 설정한다.

 Build File
ANT 스크립트를 지정한다. 일반적으로 build.xml을 지정한다.

 Properties
ANT 스크립트에 전달해야 하는 Property를 지정한다.
예를 들어 스크립트내에 $workspace라는 변수를 지정하였을 경우 –Dworkspace=값 이런식으로 텍스트 상자에 정의하면 빌드 스크립트로 인자를 전달할 수 있다.

 Java Options
ANT 를 기동하는데 필요한 자바 옵션을 지정한다. ANT도 자바 프로그램이기 때문에 여러가지 JVM 옵션이 지정되는데 Heap,Perm size등을 여기서 –Xmx256m 식으로 지정하여 이 옵션으로 ANT 프로세스를 실행할 수 있다.

여기 까지 설정하면 주기적으로 빌드를 자동화 하는 설정이  완료 되었다.

(6) Hudson의 사용
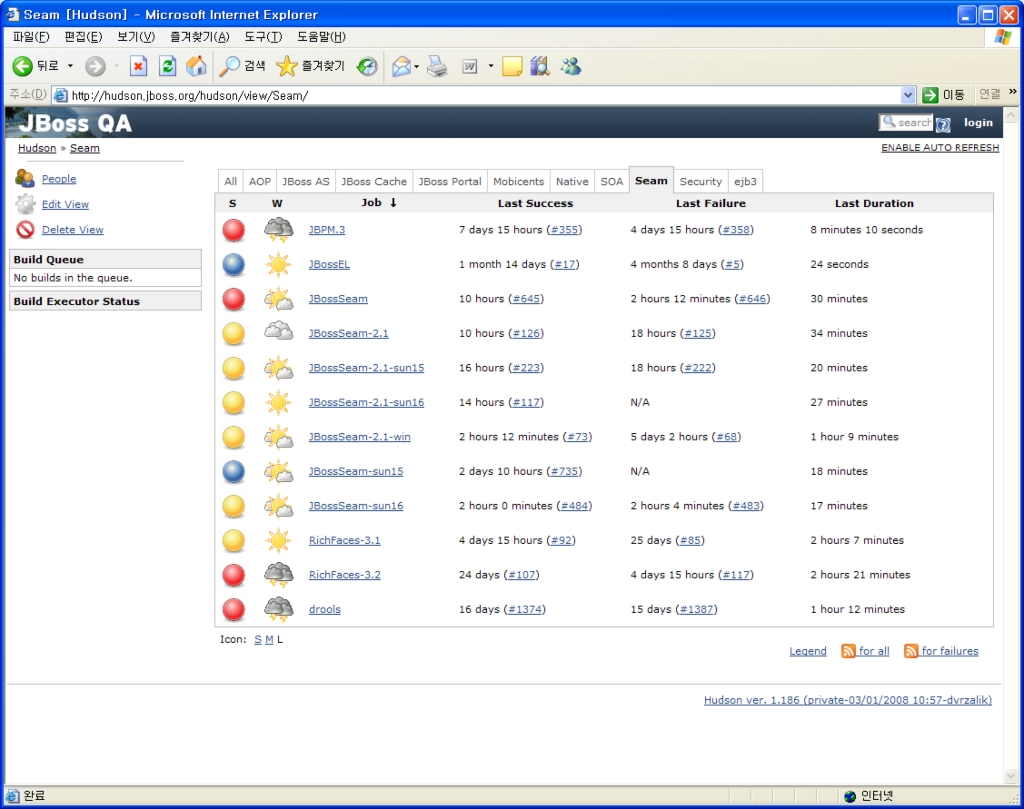
초기화면에 들어가면 등록된 프로젝트 리스트들이 나온다. 
 

사용자 삽입 이미지

초기화면에서는 현재 빌드 상태와 프로젝트별 빌드 성공 실패 여부가 나타난다. 빌드가 성공하면 맑은 태양이 실패율이 높으면 천둥 모양으로 아이콘이 변경이 된다.

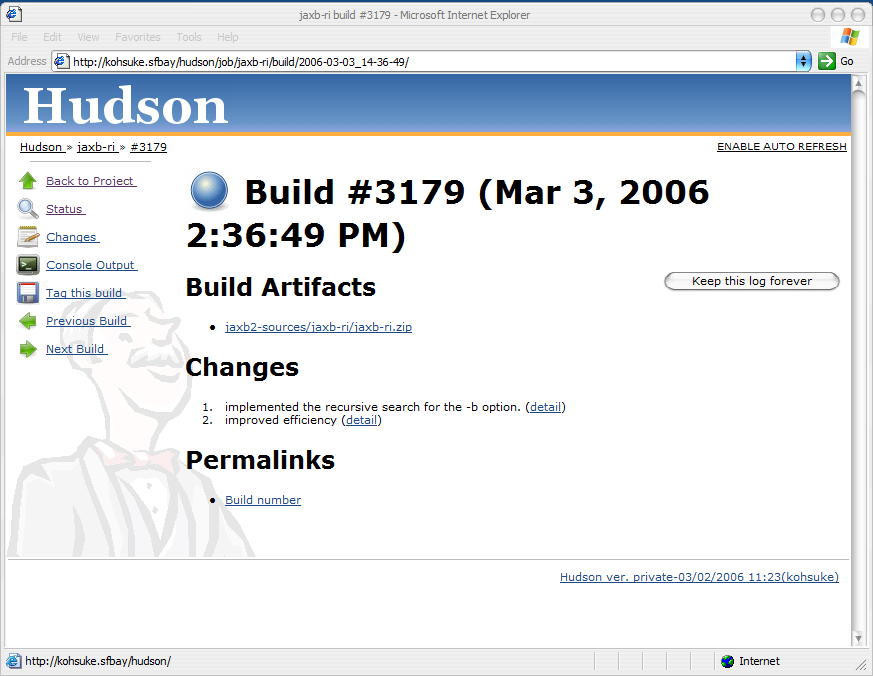
초기화면에서 프로젝트를 클릭하면 아래와 같은 화면이 나오는데
 

사용자 삽입 이미지

< 그림, Hudson 프로젝트별 초기화면 >
Changes는 빌드 버전별로 소스 관리 시스템에서 지난 버전에 비해서 변경된 내용 누가 변경했는지 그리고 커밋시에 개발자가 추가한 Comment를 확인할 수 있다.Workspace는 이 프로젝트의 빌드 디렉토리를 보여준다. 브라우져를 통해서 빌드에 사용된 파일등을 확인할 수 있다. 
그 아래 메뉴가 “Build Now”인데 이 메뉴는 스케쥴에 상관없이 지금 강제적으로 빌드를 하게 한다. 
좌측 맨 아래 메뉴는 BuildHistory로 언제 빌드가 수행되었고 현재 빌드 상태와 빌드 성공 실패 여부를 나타낸다.

(7) Hudson과 Email 연동
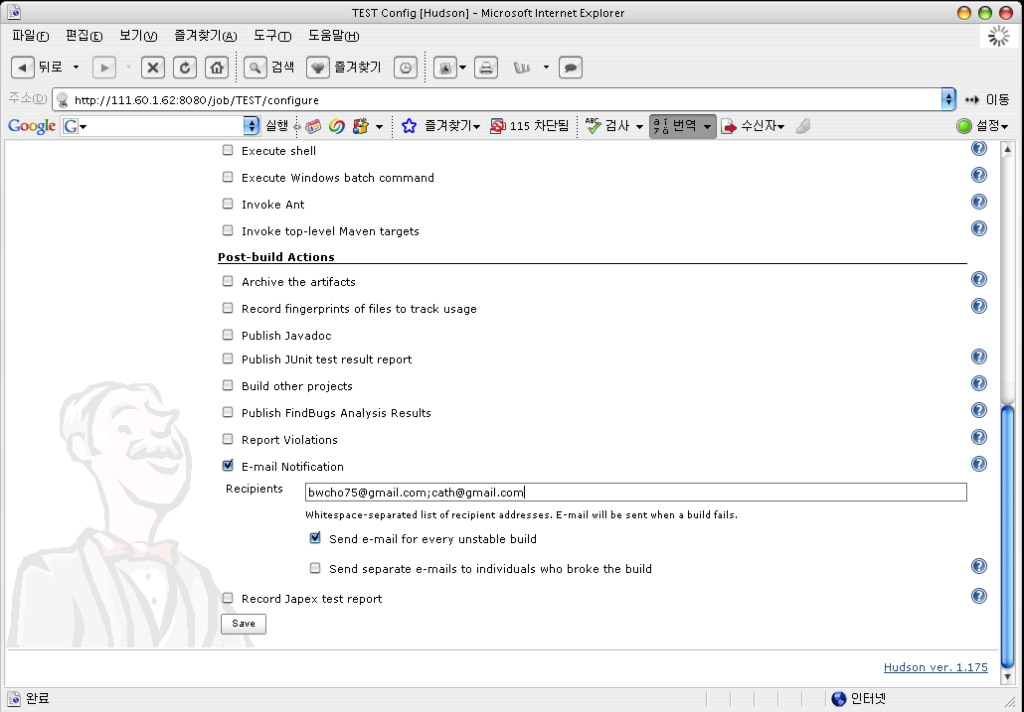
Hudson 초기화면에서 Manage Hudson > System Configuration 메뉴에 들어가면 Email-Notification 설정부분이 있는데, 여기 SMTP 서버를 설정해주면 빌드가 실패하였을 때 등에 담당자들에게 메일로 통보를 할 수 있다. SMTP 설정을 한후 프로젝트의 configuration 메뉴에서 Post-build Actions에서 Email Notification에 Receipients에 이메일 주소를 적어놓으면 빌드가 실패했을때와 실패한 빌드가 복구 되었을 때 이메일이 발송된다.
 

사용자 삽입 이미지

<그림. Email Notification 설정 >


(8) JUnit 테스트 연동
CI에 대해서 설명할 때 Test에 대해서 설명했는데, Hudson에서는 JUnit Test Report를 출력해주는 기능을 지원한다.
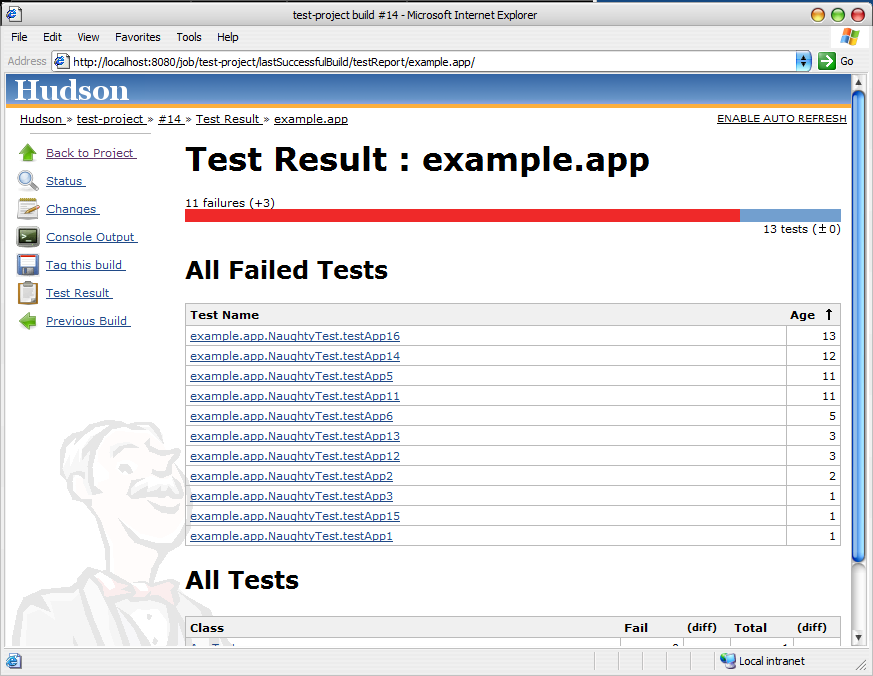
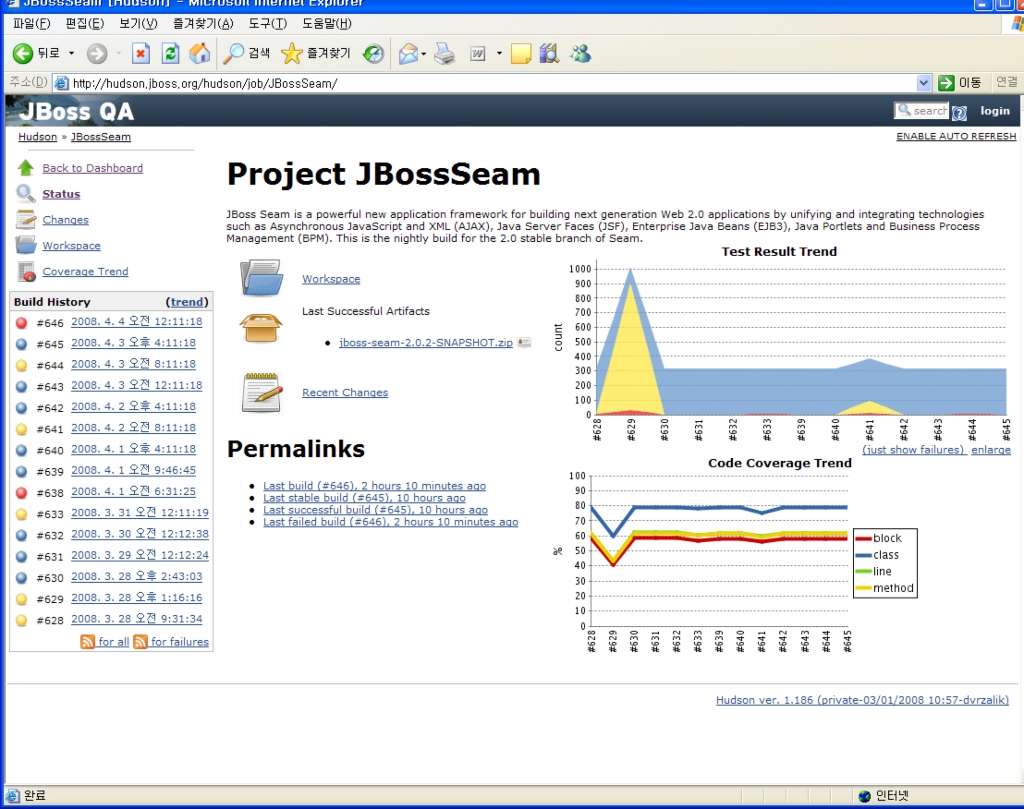
프로젝트 configuration에서 Post-build actions의 “Publish JUnit test result report” 메뉴에서 JUnit 리포트 파일명을 지정해주면 아래와 같이 테스트가 끝나고 테스트 리포트가 생성되면 테스트 성공 실패 여부를 그래프로 나타내주고, 테스트의 Progress도 누적 그래프로 프로젝트 초기화면에서 출력해준다.
사용자 삽입 이미지

<그림. 프로젝트 초기화면에서 테스트 히스토리에 대한 그래프 >  
사용자 삽입 이미지

<그림. 프로젝트별 테스트 성공 실패 요약 >

이때 주의할점은 JUnit의 테스트 리포트의 파일 경로는 절대 경로가 아니라 프로젝트 Workspace에 대한 상대 경로이기 때문에 상대 경로로 지정해야 한다.

(9) Hudson과 Japex를 이용한 부하 테스트 연동
Japex는 단위 테스트에 대한 부하 테스트를 할 수 있는 단위 부하 테스트 자동화 프레임웍이다. Japex에 대한 사용 방법은 단위 테스트의 “단위 부하 테스트” 부분을 참고하기 바란다.
Japex 역시 JUnit과 마찬가지로 성능에 대한 결과 (테스트 소요 시간)를 그래프로 출력할 수 있다. JUnit과 설정 방법이 같으며 프로젝트 > configuration > Post-build Actions > Record Japex test report에 Japex 테스트 리포트 경로를 추가하면 된다.
 
설정이 제대로 됐으면 테스트 수행후에 왼쪽에 Japex Trends Report라는 메뉴가 생겨서 성능 테스트에 대한 결과를 누적 그래프로 출력해준다.

Japex 테스트 플러그인은 Hudson에 Default로 포함된 것이 아니기 때문에http://hudson.dev.java.net에서 다운받아서 Hudson에 추가로 설치해줘야 한다.


(10) Hudson과 Cobertura를 이용한 Coverage분석
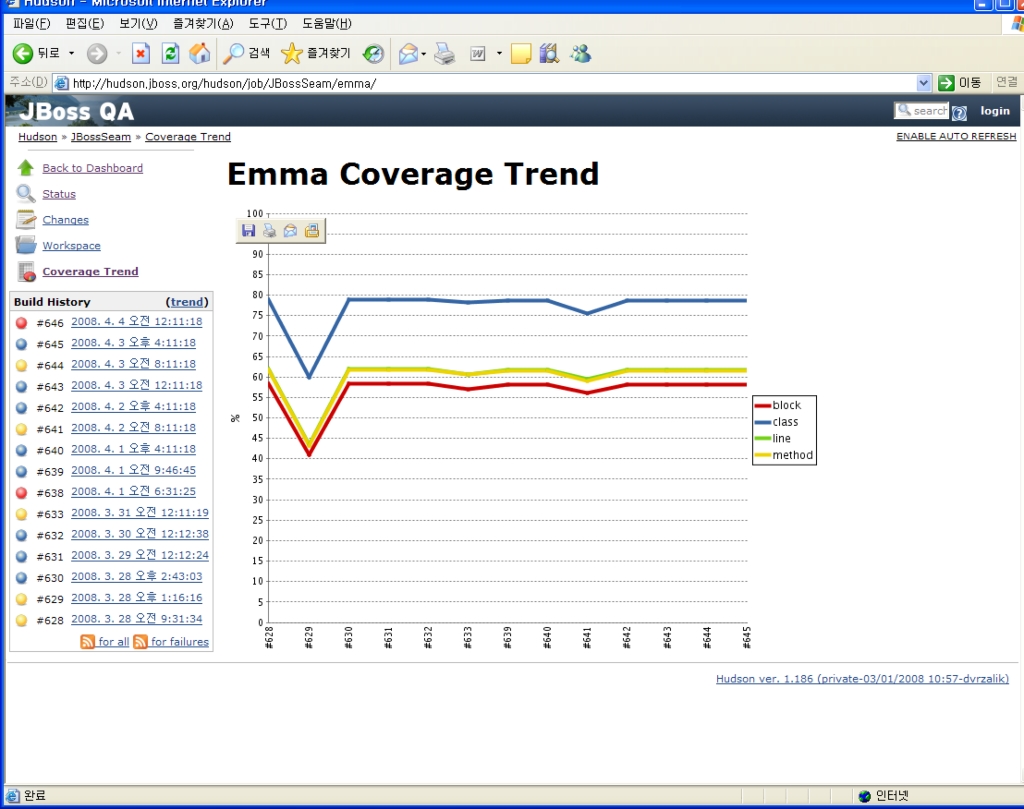
Coverage 분석에 대해서는 EMMA와 Cobertura, Clover에 대한 확장 플러그인을 제공하는데, 플러그인을 설치한후 JUnit과 Japex와 동일한 방법으로 리포트에 대한 위치를 등록해주면 아래와 같이 커버러지의 누적 그래프를 클래스별,라인별,브랜치별로 출력해준다.
 

사용자 삽입 이미지

(11) 그외의 기능들
본 문서에서는 Hudson에 대한 대략적인 기능을 살펴보았다.
Hudson은 이 이외에도 여러 개의 Hudson 인스턴스를 구성하여 클러스터된 빌드환경을 구축할 수 있다. 여기서 클러스터란 로드분산이나 장애 대응등의 의미가 아니라,
하나의 소스 코드를 가지고 Windows,AIX,HP 버전으로 각각 빌드가 필요할 때, 각 서버에 Hudson을 따로 설치하고 각각 관리하는 것이 아니라 설치는 각각 하더라도 하나의 콘솔화면에서 컨트롤을 하도록 설정이 가능하다.
또한 여러 확장 플러그인을 통해서 기능 확장이 가능하다.

(12) Hudson 사용시 주의할점
Hudson은 이미 JBoss 프로젝트나 기타 상용 프로젝트에서 사용될정도로 매우 널리 쓰이고 안정적인 버전이다. 그럼에도 불구하고 오픈 소스의 한계점과 잦은 업그레이드로 인해서 잠재적인 버그가 있고 특히 플러그인들의 버전이 Hudson의 버전 업그레이드를 쫓아가지 못해서 일부 플러그인들은 하위 버전에서만 작동하고 최신 버전에서 작동하지 않는 경우가 있기 때문에 자신이 사용하고자 하는 플러그인들에 맞는 Hudson 버전을 사용하는 것이 중요하다.
여기서 소개된 플러그인들은 Hudson 1.7 버전을 기준으로 사용 및 검증이 되었다.

4. 그외의 CI Tools
예전에는 CI 툴이 Cruise Control이나 Ant hill이 주류를 이루고 있었으나,
Hudson이 등장하면서 많은 프로젝트들이 쉽고 직관적인 인터페이스와 확장성으로 인해서 많이 사용되고 있다.
TeamCity의 경우 일반 버전은 무료로 제공되며 TeamCity Pro는 상용이다. 무료 버전도 상용 코드를 기반으로 하는 만큼 Hudson에 비해서 높은 안정성을 가지고 있으다.
AntHill Pro 역시 꾸준히 Java 진영의 CI도구로 사용되고 Atlassian의 Bamboo도 근래에 들어 많이 프로젝트에 사용되고 있다.


출처 : http://bcho.tistory.com/entry/Hudson%EC%9D%84-%EC%9D%B4%EC%9A%A9%ED%95%9C-%EB%B9%8C%EB%93%9C-%EB%B0%B0%ED%8F%AC-%ED%85%8C%EC%8A%A4%ED%8A%B8-%EC%9E%90%EB%8F%99%ED%99%94


'기타' 카테고리의 다른 글

[Gerrit] 환경 구축  (0) 2020.04.15
넥서스 S 바이너리 올리기  (0) 2012.11.25
VPN  (0) 2011.05.03
SVN GUI TOOL[SVN Tool - RapidSVN 사용법]  (0) 2011.02.09
SVN  (0) 2011.02.09

[Intro]

제가 이전에 세미나에서 발표 했던 내용과도 관련이 있는 내용이긴 합니다.

Activity를 안전하게 보호하기 위한 방법 중에서,

<activity> 태그에 있는 exported 속성을 false로 만들어서

다른 어플리케이션에서 접근 할 수 없게 만들 수 있었습니다.


그런데 exported ="false"속성은 다른 어플리케이션에서 전혀 보이지 않게 숨기는 속성이기 때문에,

재사용을 할 수 없다는, 다소 Activity 철학과는 살짝 거리가 있는 속성이기도 합니다.

뭐... 그래도 재사용 필요없는 Activity에겐 유용한 속성이긴 하지요.


[exported="false" 를 쓰면 안되는 상황이 있다고?]

예... 그렇습니다. 모든 상황에서 사용 가능한건 아닙니다.


원래 오늘 별 내용 없습니다. 간단한 메모 수준의 포스팅이죠.

exported="false" 속성을 사용하면 안되는 상황이 있는데,

바로 MAIN/LAUNCHER Activity에는 사용하면 절대 안됩니다.


모든 Activity들을 안전하게 만든다고 모두 exported="false" 속성을 주어서는 안됩니다.

MAIN/LAUNCHER Activity에 exported="false" 속성을 주면

다음과 같은 exception이 발생합니다.

ERROR/Rosie(255): 
Launcher does not have the permission to launch Intent 
{ action=android.intent.action.MAIN categories={android.intent.category.LAUNCHER}

flags=0x10200000 comp={kr.vizpei.blog/kr.vizpei.blog.TestActivity} }. 
Make sure to create a MAIN intent-filter for the corresponding activity or use the exported attribute for this activity.


ERROR/Rosie(255): 
java.lang.SecurityException: Permission Denial
starting Intent { action=android.intent.action.MAIN categories=
{android.intent.category.LAUNCHER} flags=0x10200000 
comp={kr.vizpei.blog/kr.vizpei.blog.TestActivity} } 
from ProcessRecord{43851f00 255:com.htc.launcher/9999} (pid=255, uid=9999) 
requires null

먼저 SecurityException이 발생 하고,

exported 속성을 true로 설정해 달라는 메세지가 출력됩니다.


절대로 MAIN/LAUNCHER Activity에 exported="false" 속성을 주지 맙시다!


출처 : http://blog.naver.com/PostList.nhn?blogId=visualc98&categoryNo=0&from=postList

void onLoadResource(WebView view, String url)

외부 리소스를 불러올 때 처리할 내용을 구현한다.


void onPageFinished(WebView view, String url)

페이지 로딩이 완료 되었을 때 처리할 내용을 구현한다.


void onPageStarted(WebView view, String url, Bitmap favicon)

페이지 로딩이 시작될 때 처리할 내용을 구현한다.


void onReceivedError(WebView view, int errorCode, String description, String failingUrl)

오류가 발생했을 때 처리할 내용을 구현한다.


void onScaleChanged(WebView view, float oldScale, float newScale)

스케일이 변경되었을 때 처리할 내용을 구현한다.


WebResourceResponse shouldInterceptRequest(WebView view, String url)

리소스 요청이 있을 때 처리할 내용을 구현한다.


boolean shouldOverrideKeyEvent(WebView view, KeyEvent event)

키 이벤트 발생시에 처리할 내용을 구현한다.


boolean shouldOverrideUrlLoading(WebView view, String url)

새로운 Url을 불러 오려고 할 때 처리할 내용을 구현한다.

안드로이드 개발자 사이트에 보면 tcpdump 를 이용하는 방법이 있다. 
Linux나 Windows에서 tcpdump를 사용해본 경험이 있는 분들은 간단하게 아래 설명을 보면된다.

arm용으로 빌드된 tcpdump-arm (첨부파일을 받아 확장자 변경) 바이너리를 단말기나 Emulator에 push한다.

$adb remount
$adb push ./tcpdump-arm /data/local
$adb
#cd /data/local
#chmod 777 tcpdump-arm
#./tcpdump-arm -X -n -s 0 port 80 -w /sdcard/capture.pcap //만일 80 포트에서 I/O되는 패킷을 저장할 경우 
...
... 인터넷 작업...
...
#^c
sdcard에서 저장된 capture.pcap파일을 꺼내어 wireshark(http://www.wireshark.org/download.html) 를 이용하여 TCP Stream을 확인하면 된다. tcpdump는 서버로부터 아무 응답이 없는 경우 단말기의 Socket에서 SYN (TCP 연결) 패킷이 보내졌는지, 서버가 응답안하는지, 전송, 응답 패킷을 확인하는 경우 유용하다.

[펌] Debugging with tcpdump and other tools

Installing tcpdump

Pushing the binary to an existing device

Download tcpdump from http://www.tcpdump.org/, then execute:

adb root
adb remount
adb push /wherever/you/put/tcpdump /system/xbin/tcpdump
adb shell chmod 6755 /data/local/tmp/tcpdump
adb shell
#./tcpdump-arm 

If you are running your own build, execute:

mmm external/tcpdump  # install the binary in out/.../system/xbin
make snod # build a new system.img that includes it

Flash the device as usual, for example, fastboot flashball.

If you want to build tcpdump by default, add CUSTOM_TARGETS += tcpdump to your buildspec.mk.

Running tcpdump

You need to have root access on your device.

Batch mode capture

The typical procedure is to capture packets to a file and then examine the file on the desktop, as illustrated below:

adb shell tcpdump -i any -p -s 0 -w /sdcard/capture.pcap
# "-i any": listen on any network interface
# "-p": disable promiscuous mode (doesn't work anyway)
# "-s 0": capture the entire packet
# "-w": write packets to a file (rather than printing to stdout)

... do whatever you want to capture, then ^C to stop it ...

adb pull /sdcard/capture.pcap .
sudo apt-get install wireshark # or ethereal, if you're still on dapper
wireshark capture.pcap # or ethereal

... look at your packets and be wise ...

You can run tcpdump in the background from an interactive shell or from Terminal. By default,tcpdump captures all traffic without filtering. If you prefer, add an expression like port 80 to thetcpdump command line.

Real time packet monitoring

Execute the following if you would like to watch packets go by rather than capturing them to a file (-n skips DNS lookups. -s 0 captures the entire packet rather than just the header):

adb shell tcpdump -n -s 0

Typical tcpdump options apply. For example, if you want to see HTTP traffic:

adb shell tcpdump -X -n -s 0 port 80

You can also monitor packets with wireshark or ethereal, as shown below:

# In one shell, start tcpdump.
adb shell "tcpdump -n -s 0 -w - | nc -l -p 11233"

# In a separate shell, forward data and run ethereal.
adb forward tcp:11233 tcp:11233 && nc 127.0.0.1 11233 | ethereal -k -S -i -

Note that you can't restart capture via ethereal. If anything goes wrong, you will need to rerun both commands.

For more immediate output, add -l to the tcpdump command line, but this can cause adb to choke (it helps to use a nonzero argument for -s to limit the amount of data captured per packet; -s 100is sufficient if you just want to see headers).

Disabling encryption

If your service runs over httpstcpdump is of limited use. In this case, you can rewrite some service URLs to use http, for example:

vendor/google/tools/override-gservices url:calendar_sync_https_proxy \

https://www.google.com/calendar rewrite http://android.clients.google.com/proxy/calendar

Other network debugging commands

On the device:

  • ifconfig interface: note that unlike Linux, you need to give ifconfig an argument
  • netcfg: lists interfaces and IP addresses
  • iftop: like top for network
  • route: examine the routing table
  • netstat: see active network connections
  • ncnetcat connection utility

On the desktop:

  • curl: fetch URLs directly to emulate device requests

Sunday, August 30th, 2009 | Author: Tim

Dumping packets..

So a while back I had written about gathering packets from the android phone - often using simple ARP spoofing and Wireshark to grab all the traffic. Sadly I kept postponing this post and then just forgot to put it up, showing how to grab the packets in a much easier way, which doesn’t even require you to put your android phone on a WIFI network.

I’m not sure why this method never seemed to dawn on me in the beginning - since it’s so simple basically and has come in hand numerous times since :)

On your computers shell/cmd;

adb shell tcpdump -vv -s 0 -w /sdcard/output.cap

A quick run down of the switches we are using are the following;

-vv puts tcpdump into verbose mode - to give us some extra information
-s 0 sets the size of sender to look for to zero, telling the program to grab all packets
-w /sdcard/output.cap will let us set the packets grabbed to be written to the sdcard for analysis later.

Once your done just break the command (control-c) and go open up the .cap file with your favorite analyzer like wireshark.

You can also just run this command from your favorite terminal on the phone — allowing you to grab packets on the go. This should be pretty obvious, though I feel I must say it since people seem to think adb is something unlike a terminal? I’m not sure why this comes up, but people end up pasting the same thing I’ve done often, and then saying “You can just do it in a terminal on the phone, and it’s easiierr!”. Well yes, yes you can… Though copy-pasta-ing someones ideadoesn’t make your much brighter ;)

Directly on the phone, or already adb’ed into it;

tcpdump -vv -s 0 -w /sdcard/output.cap

Update: 8/31/09 I’ve pulled the tcpdump from my rom and uploaded it to my server, you can download it here: tcpdump. It is tcpdump version 3.9.8 libpcap version 0.9.8 - for anyone wondering. Push this file to you /system/bin or /system/xbin and then chmod’ing it to be executable should make this work. Enjoy!


출처 : http://blog.naver.com/PostView.nhn?blogId=vicfaith&logNo=150086174382

프로그래밍에 친숙한 네트워크 전문가는 프로토콜 문서를 보는 것보다 그 프로토콜이 구현된 API를 들여다 보는 것을 통해 보다 빠르고 정확하게 프로토콜에 대해 이해하기도 한다. - Softgear Ko


본 문서는 http://developer.android.com/sdk/android-4.0.html 의 WiFi Direct 를 번역하였습니다.


Wi-Fi Direct

안 드로이드는 이제 사용자간 연결(P2P)을 위한 Wi-Fi Direct 를 지원한다. 이 P2P 연결은, 핫스팟이나 인터넷 연결 없이, 안드로이드 장치 또는 다른 디바이스 간의 직접 연결 및 통신을 말한다. 안드로이드 프레임워크는 Wi-Fi P2P API를 제공하여, 당신이 Wi-Fi Direct를 지원하는 다른 디바이스를 찾고 연결할 수 있도록 하고, Bluetooth 연결보다 더 긴 거리에서 더 빠른 통신을 가능하게 한다.


새로운 패키지 android.net.wifi.p2p 

(http://developer.android.com/reference/android/net/wifi/p2p/package-summary.html

는 Wi-Fi를 통한 P2P 연결을 수행하는데 필요한 모든 API를 포함한다. 당신이 사용하게 될 주 클래스는 WifiP2pManager 이다. 이는 당신이 getSystemService(WIFI_P2P_SERVICE) 를 호출하여 사용할 수 있다. WifiP2pManager 는 다음 기능을 가진 API들을 포함한다.


* initialize() 를 호출하여 P2P 연결을 위한 당신의 어플리케이션을 초기화

* discoverPeers() 를 호출하여 이웃 디바이스를 찾아내기(discover)

* connect()를 호출하여 P2P 연결을 시작

* 기타 기능


몇몇 다른 필수적인 인터페이스 및 클래스는 다음과 같다.

* WifiP2pManager.ActionListener 인터페이스는 당신이 상대방을 찾거나(discover) 연결하는 동작이 성공하거나 실패한 경우 호출되는 콜백(callback)을 받을 수 있게 한다.

* WifiP2pManager.PeerListListener 인터페이스는 당신이 발견된 상대방에 관한 정보를 받을 수 있게 한다. 이 콜백은 WifiP2pDeviceList 를 제공하는데, 여기서 통신 범위내에 있는 각 디바이스 별 WifiP2pDevice 객체를 뽑아내어, 디바이스 이름, 주소, 디바이스 타입, WPS 설정 등과 같은 정보를 얻을 수 있다.

* WifiP2pManager.GroupInfoListener 인터페이스는 당신이 P2P 그룹에 관한 정보를 받을 수 있게 한다. 이 콜백은 WifiP2pGroup 객체를 제공하는데, 이는 소유자(owner), 네트워크 이름, 암호구문(passphrase) 등과 같은 그룹 정보를 제공한다.

* WifiP2pManager.ConnectionInfoListener 인터페이스는 당신이 현재 연결에 관한 정보를 받도록 한다. 이 콜백은 WifiP2pInfo 객체를 제공하는데, 이는 그룹이 구성되었는지 여부, 누가 그룹 소유자인지를 포함한다.


Wi-Fi P2P API들을 사용하기 위해서는, 당신의 어플은 다음 사용자 권한들을 요청해야 한다.

* ACCESS_WIFI_STATE

* CHANGE_WIFI_STATE

* INTERNET (비록 당신의 어플이 기술적으로 인터넷에 연결하지 않을지라도, Wi-Fi Direct 통신을 위한 표준 java socket들은 Internet permission을 요구한다)


안드로이드 시스템은 다음과 같은 Wi-Fi P2P 이벤트에 대해 몇가지 action을 broadcast한다.

* WIFI_P2P_CONNECTION_CHANGED_ACTION: P2P연결 상태가 변경 되었음을 나타낸다.. 이는 WifiP2pInfo 객체를 가진 EXTRA_WIFI_P2P_INFO 와 NetworkInfo 객체를 가진 EXTRA_NETWORK_INFO 를 전달한다.

* WIFI_P2P_STATE_CHANGED_ACTION: P2P 상태가 enabled와 disabled 사이에서 변경 되었음을 나타낸다. 이는 WIFI_P2P_STATE_DISABLED 또는 WIFI_P2P_STATE_ENABLED 를 가진 EXTRA_WIFI_STATE 를 전달한다.

* WIFI_P2P_PEERS_CHANGED_ACTION: 상대방 디바이스 리스트가 변경되었음을 나타낸다.

* WIFI_P2P_THIS_DEVICE_CHANGED_ACTION: 이 디바이스에 대한 세부사항(details)가 변경되었음을 나타낸다.


더 자세한 정보를 위해서는 WifiP2pManager 문서 

http://developer.android.com/reference/android/net/wifi/p2p/WifiP2pManager.html ) 

를 참고하라. 그리고 또한, Wi-Fi Direct 데모 샘플 어플리케이션 

http://developer.android.com/resources/samples/WiFiDirectDemo/index.html ) 

을 보라.


- 문서끝.


출 처: 쏘프트 스토리에서 퍼옴.
         http://blog.naver.com/PostView.nhn?blogId=softgear&logNo=100150666274

'안드로이드' 카테고리의 다른 글

WebViewClient  (0) 2012.07.12
Android WireShark TCP dump  (0) 2012.07.12
Android 빌드하기  (0) 2012.03.03
Framework에서 Attrs.xml에 추가하기  (0) 2012.02.03
Device Administration  (0) 2012.01.28

Target Board  이솝 커뮤니티의 S5PC100 보드를 사용하므로이솝 프로젝트 사이트 내용을 참고합니다.

http://www.aesop.or.kr/?mid=issuetracker&vid=AESOPC100


1.       Install GCC Tool chain

-          Download : http://www.aesop.or.kr/?mid=issuetracker&act=dispIssuetrackerDownload&vid=AESOPC100

GCC : arm-s5pc1xx-linux-gnueabi-4.3.2.tar.gz

GCC 4.3.2  사용하며, GCC 관련 자료는 http://gcc.gnu.org 확인 하시기 바랍니다.


-          압축해제

이솝 보드용 Tool chain 호스트 시스템의 /opt 디렉터리에 설치를 합니다.

/opt 폴더를 복사하고다음의 명령으로 압축을 해제하시면 됩니다.


sudo tar xzf arm-s5pc1xx-linux-gnueabi-4.3.2.tar.gz


1.png


-          환경설정

Tool chain  Path  설정해주는 것이며다음과 같이 합니다.


sudo gedit /etc/profile


아래와 같이 창이 열리면선택된 부분과 같이 아래 Path  추가해 줍니다.

PATH=$PATH:$HOME/bin:/opt/s5pc1xx/cross/armv7a/bin


2.png


source /etc/profile


PATH 설정 확인

echo $PATH


3.png


arm-s5pc1xx-linux-gnueabi-gcc –v


4.png


2.       Install & Build U-Boot

-          Download : http://www.aesop.or.kr/?mid=issuetracker&act=dispIssuetrackerDownload&vid=AESOPC100

U-Boot 1.3.4 : u-boot-1.3.4-aesop.100428.tar.gz


-          압축해제

본인이 사용할 적절한 위치에 압축을 풀어 주시면 됩니다.

tar 명령어로 하셔도 되고그냥 파일 브라우저에서 압축해제 툴로 바로 실행하셔도 풀어도 됩니다.


5.png


-          U-Boot Build

다음과 같이 명령어를 수행합니다.

make clobber               <- 기존에 만들어 것들을 제거

make ntc100_config    <- 이솝보드용 config 설정

make                       


6.png


빌드 완료가 되면 아래 화면에서 처럼 u-boot.bin  사용하면 됩니다.


7.png


3.       Install & Build Android Linux Kernel

-          Download : http://www.aesop.or.kr/?mid=issuetracker&act=dispIssuetrackerDownload&vid=AESOPC100

Linux Kernel 2.6.29 : android-2.6.29-aesop-RTM10.tar.gz

해당 Kernel Android  X-Windows 모두 지원을 합니다.


-          Kernel Build

tar xzf android-2.6.29-aesop-RTM10.tar.gz

cd android-2.6.29-aesop-RTM10

make ntc100_xwindows_defconfig   <- X-Winodws  커널 빌드 

make ntc100_android_defconfig      <- Android  커널 빌드 

make zImage


아래와 같이 빌드가 완료되었으며, arch/arm/boot/zImage  생성이 되었습니다.

8.png


4.       Build Android

-          Download  “Android 개발환경 구축” 게시물을 참조하시기 바라며,

추가로 이솝 보드용 소스는 아래와 같습니다.

Android Eclair : http://www.aesop.or.kr/?mid=issuetracker&act=dispIssuetrackerDownload&vid=AESOPC100


-          Build

Android source  있는 위치에서 아래와 같이 aesopc100_build.sh  실행하면 됩니다.


eastsky@ubuntu:~/dawid/android/android_eclair_aesopc100$ ./aesopc100_build.sh


9.png


빌드가 완료되면 아래와 같이 system.img 파일이 생성이 됩니다.


10.png


.. /android_eclair_aesopc100/out/target/product/smdkc100 아래 img 파일이 생성이 됩니다.


11.png


5.       Make NFS – Android  Root Fils System

-          NFS  디렉토리 생성  FS 파일을 복사 (본인에 맞게 적절한 곳을 지정하여 만들면 됩니다).

일단 /out/target/product/smdkc100  Output 파일들이 있는 곳으로 이동을 합니다.


cd /home/eastsky/dawid/android/android_eclair_aesopc100/out/target/product/smdkc100


12.png


 root 에서 편하게 사용하기 위해 root 계정으로 전환하고 아래와 같은 경로로 생성합니다.


mkdir /root/work/rootfs/test


그리고 아래와 같이 파일들을 복사합니다.

cp -a root/*  /root/work/rootfs/test

cp -a data   /root/work/rootfs/test/data/

cp -a system  /root/work/rootfs/test/system/


NFS 용으로 사용할 디렉토리 /root/work/rootfs/test  이동 합니다.

그리고 권한을 아래와 같이 변경하여 줍니다.


chown -R root.root *

chmod -R 777 data system


13.png


6.       Android New Vender & Product  (출처 이솝의 고도리님 http://www.aesop.or.kr/?document_srl=265476#7)

이솝 보드용 Android 소스를 그대로 사용하면 굳히 따로 아래와 같이 Vendor  따로  만들고 하셔도 됩니다.


l  일단 android 다운로드 받은 디렉토리로 움직인 후에 aesop이란 vendor 하나 만듭니다.

기존에 있는 sample 이용해서 하나 만들도록 하겠습니다.


cd vendor

cp -a sample aesop

cd aesop


Android.mk

products  빼고 전부 삭제


================================================

rm -rf apps/ frameworks/ sdk_addon/ skins/

================================================


l   products 새롭게 정의


1>

                  cd products

                  vi AndroidProducts.mk


                  ===========================================

                  PRODUCT_MAKEFILES := \

                    $(LOCAL_DIR)/sample_addon.mk


                  ==> 이렇게  것을 새로운 보드 이름으로 대체


                  PRODUCT_MAKEFILES := \

                    $(LOCAL_DIR)/ntc100.mk

                  ===========================================


                  그리고 기존의 복잡한 sample관련 mk 파일을 지웁니다.

                  rm sample_addon.mk


2>

ntc100.mk 다음과 같이 edit

                  vi ntc100.mk


                  =============================================

                  $(call inherit-product, build/target/product/generic.mk)


                  PRODUCT_MANUFACTURER := aesop

                  PRODUCT_NAME := ntc100

                  PRODUCT_DEVICE := ntc100

                  PRODUCT_BOARD := ntc100

                  =============================================


l   새롭게 추가된 board 대한 directory 구성

기존의 generic board 것을 이용한다. generic board 디렉토리를 ntc100 디렉토리로 복사

                  cd ..

                  cp -a ../../build/target/board/generic/ ./ntc100     <- Vender  새로 만든 것입니다.


 부분은 적용하지 않아도 된다. board 따라 틀림(kernel 따라)

                   부분은 product kernel 내에서의 keypad driver 따라 keylayout 지정하는 부분인데,

 부분은 건너뛰어도 됩니다.


                  그냥 이게 없으면 qwerty.kl  로딩되거든요.

                 ================================================================

                  vi AndroidBoard.mk

                  tuttle2 nt-keypad 수정(여기서 nt-keypad key device driver 이름이다)


                  mv tuttle2.kcm nt-keypad.kcm

                  mv tuttle2.kl nt-keypad.kl

                 =================================================================


                  vi BoardConfig.mk 해서 USE_CAMERA_STUB:=true  추가한다.

                  이유는

                 =================================================================

                  //주의사항

                  frameworks/base/camera/libcameraservice/Android.mk 보면


                  #

                  # Set USE_CAMERA_STUB for non-emulator and non-simulator builds, if you want

                  # the camera service to use the fake camera.  For emulator or simulator builds,

                  # we always use the fake camera.


                  ifeq ($(USE_CAMERA_STUB),)

                   USE_CAMERA_STUB:=false

                   ifneq ($(filter sooner generic sim,$(TARGET_DEVICE)),)

                    USE_CAMERA_STUB:=true

                   endif #libcamerastub

                  endif


                   경우

                  USE_CAMERA_STUB:=true  BoardConfig.mk  넣어줘야 한다.

                 =================================================================


l   build script 만들기

android top으로 가서 vi ntc100.sh 해서

=======================================================================

#!/bin/sh


CPU_JOB_NUM=$(grep processor /proc/cpuinfo | awk '{field=$NF};END{print field+1}')


START_TIME=`date +%s`

echo make -j$CPU_JOB_NUM PRODUCT-ntc100-eng

echo

make -j$CPU_JOB_NUM PRODUCT-ntc100-eng

if [ $? != 0 ] ; then

                                    exit $?

fi


END_TIME=`date +%s`


echo "Total compile time is $((($END_TIME-$START_TIME)/60)) minutes $((($END_TIME-$START_TIME)%60)) seconds"

========================================================================


저장하고 나온 후에

(

                   명령은 samsung C100 code 보면 build script 있는데 그것을 베낀 것입니다.

                  실제로는 host cpu갯수를 읽은 후에


                  make PRODUCT-ntc100-eng


                  -j 옵션을 이용해서 실행하는 것입니다.

)

                 생성된 script 실행 permission 줍니다.


chmod 755 ntc100.sh

'안드로이드' 카테고리의 다른 글

Android WireShark TCP dump  (0) 2012.07.12
[WiFi Direct] WiFi Direct in Android 4.0 API Overview (번역)  (0) 2012.05.07
Framework에서 Attrs.xml에 추가하기  (0) 2012.02.03
Device Administration  (0) 2012.01.28
MIME-Type 의 종류  (0) 2012.01.26
인터넷을 찾아보면서 어떻게 해야되는지 이해하지 못했다.
하지만 여러번의 삽질 끝에 찾았다.
방법은 다음과 같다.

frameworks/base/core/res/res/vlaues/attrs.xml에 원하는 속성을 추가.
여기선 Theme에 추가를 기준으로 했다.

<declare-styleable name="Theme">
...
<!-- Present the text in ALL CAPS. This may use a small-caps form when available. -->
<attr name="textAllCaps" />

<!-- csjung test. -->
<attr name="csjung" format="string" />
</declare-styleable>
위의 조건은 Public 형식.
만약 Private 처리하고싶다면 생성한 attr위에 hide를 선언.
<!-- @hide csjung test. -->
<attr name="csjung" format="string" />
</declare-styleable>

그리고 다음의 파일을 Open.
frameworks/base/core/res/res/vlaues/Public.xml
테마가 선언된 인덱스에서 가장 마지막 연동 인덱스에 추가.
 <public type="attr" name="publicKey" id="0x010103a6" />
 <public type="attr" name="csjung" id="0x010103a7" />

 <public type="style" name="TextAppearance.SuggestionHighlight" id="0x01030118" />
위에서 확인시 publicKey가 Theme 가 선언된 Index에서의 가장 마지막에 선언된 Index.

그리고 확인을 해봐야 하나 Theme는 Default Theme 를 선언해줘야 하는 것 같음.
이는 확인을 해봐야 함.
아직 확인은 하지 못했지만, 저는 frameworks/base/core/res/res/vlaues/Themes.xml에
다음과 같이 Default값을 선언.
<style name="Theme">
    <item name="csjung">@android:string/candidates_style</item>
    <item name="colorForeground">@android:color/bright_foreground_dark</item>

그리고 나서 Build 창에서 'make update-api' 란 명령어를 실행.

결과
framesorks/base/api/current.txt에 추가한 api가 등록된 것을 확인.

Device Administration


Android developer site 의 번역 입니다.

가급적 전문 용어는 원문을 사용하였으며, 의역이 꽤 있습니다.


원문 출저 / 번역자 명시 하에 수정/재배포 가능 합니다.

번역자 : nilakantha38@gmail.com
원문 : http://developer.android.com/guide/topics/admin/device-admin.html


Device Administration


Android 2.2 introduces support for enterprise applications by offering the Android Device Administration API. The Device Administration API provides device administration features at the system level. These APIs allow you to create security-aware applications that are useful in enterprise settings, in which IT professionals require rich control over employee devices. For example, the built-in Android Email application has leveraged the new APIs to improve Exchange support. Through the Email application, Exchange administrators can enforce password policies — including alphanumeric passwords or numeric PINs — across devices. Administrators can also remotely wipe (that is, restore factory defaults on) lost or stolen handsets. Exchange users can sync their email and calendar data.


Android 2.2 는 Android Device Andministration API 를 통해, 보안성 등이 필요시되는 기업 어플리케이션을 위한 지원을 한다. Device Administration API  는 system 레벨에서의 기기 관리 기능을 제공한다. 이 API 들은 당신이 IT 기업에서 고용자의 기기에 설정하고자 하는 다양한 보안 설정을 지원하는 어플리케이션의 개발에 유용하게 사용될 수 있다.
예를 들어, Android 에 포함 되어 있는 Email app 은 Exchange 기능 지원을 개선하기 위해 이 API 를 사용했다. Email app 에서 Exchange 관리자는 기기들에 password 정책을 강제 할 수 있다 - 알파벳+숫자 조합 password 나 숫자로만 이루어진 password 등을 포함해서.
관리자는 또한, 잃어버리거나 도둑 맞은 기기에 원격 데이터 삭제 기능(기기를 출고 직후 상태로 되돌린다)을 사용 할 수 있다. Exchange 사용자는 email 과 calendar 데이터를 sync 할 수 있다.

This document is intended for developers who want to develop enterprise solutions for Android-powered devices. It discusses the various features provided by the Device Administration API to provide stronger security for employee devices that are powered by Android.


이 기기는 Android 기기에 enterprise solution 을 개발하고자 하는 개발자들을 위한다. 직원의 Android 기기에 강력한 보안 기능을 개발하기 위한 기능을 제공하는 Device Administration API 에 대해 이야기 한다.

Device Administration API Overview

Here are examples of the types of applications that might use the Device Administration API:
  • Email clients.
  • Security applications that do remote wipe.
  • Device management services and applications.

Device Administration API 를 사용할 만한 application 의 종류는 다음과 같다 :
  • Email client application
  • 원격 데이터 삭제를 하는 보안 application
  • 기기 관리 서비스와 application

How does it work?

You use the Device Administration API to write device admin applications that users install on their devices. The device admin application enforces the desired policies. Here's how it works:
  • A system administrator writes a device admin application that enforces remote/local device security policies. These policies could be hard-coded into the app, or the application could dynamically fetch policies from a third-party server.
  • The application is installed on users' devices. Android does not currently have an automated provisioning solution. Some of the ways a sysadmin might distribute the application to users are as follows:
    • Android Market.
    • Enabling non-market installation.
    • Distributing the application through other means, such as email or websites.
  • The system prompts the user to enable the device admin application. How and when this happens depends on how the application is implemented.
  • Once users enable the device admin application, they are subject to its policies. Complying with those policies typically confers benefits, such as access to sensitive systems and data.

사용자들이 그들의 기기에 설치할 기기 관리 application 을 개발하기 위해 당신은 Device Administration API 를 사용할 것이다.
Device admin application 은 보안 정책을 강제한다. 이것은 다음과 같이 동작한다 :
  • system administrator 는 원격/또는 지역적으로 동작할 device security 정책을 강제할 device admin application 을 개발한다.
  • 해당 application 이 사용자의 기기에 설치된다. Android 는 현재로썬 자동화된 설치 방법은 없다. system admin 은 다음과 같은 방법으로 application 을 유저에게 배포 할 수 있다 :
    • Android market
    • non-market 설치를 허용하기.
    • email 이나 website 로 배포하기.
  • system 은 사용자가 device admin application 을 활성화 하도록 해야 한다. 이것이 어떻게, 언제 이루어지는지는 application 이 어떻게 구현 되었는가에 달렸다.
  • 한번 사용자들이 device admin application 을 활성화 하면, 사용자들은 device admin application 의 정책을 따르게 된다. 이 정책들을 따르는 것은 민감한 시스템과 데이터로의 접속과 같은 이익을 제공할 수 있을 것이다.


If users do not enable the device admin app, it remains on the device, but in an inactive state. Users will not be subject to its policies, and they will conversely not get any of the application's benefits—for example, they may not be able to sync data.


사용자들이 device admin app 을 활성화 하지 않으면, 그것은 device 에 남아 있겠지만, 비활성화 된 상태로 있을 것이다. 사용자들은 그 정책을 따르지 않게 되고, application 의 기능을 사용하지 못할 것이다 - 예를 들면, data 를 sync 하지 못할 것이다.

If a user fails to comply with the policies (for example, if a user sets a password that violates the guidelines), it is up to the application to decide how to handle this. However, typically this will result in the user not being able to sync data.


사용자가 정책을 따르지 않는다면(예를 들어, 사용자가 가이드라인을 어기는 password 를 설정한다던지), 이를 어떻게 제어할지는 application 의 몫이다. 다만, 일반적으로는 사용자가 data sync 를 못하게 할 것이다.

If a device attempts to connect to a server that requires policies not supported in the Device Administration API, the connection will not be allowed. The Device Administration API does not currently allow partial provisioning. In other words, if a device (for example, a legacy device) does not support all of the stated policies, there is no way to allow the device to connect.


기기가 Device administration API 에서 지원하지 않는 정책을 요구하는 서버에 연결을 시도하면, 연결은 실패할 것이다. Device Administration API 는 현재로썬 partial provisioning 을 지원하지 않는다. 달리 말하자면, 기기가(예를 들어, 구형 버전의 기기) 모든 정책을 지원하지 않는다면, 해당 기기를 연결할 방법이 없다.

If a device contains multiple enabled admin applications, the strictest policy is enforced. There is no way to target a particular admin application.


기기가 여러개의 admin application 을 활성화 했다면, 가장 강한 정책이 설정된다.
개별의 admin application 을 부분적으로 사용하는 방법은 없다.

To uninstall an existing device admin application, users need to first unregister the application as an administrator.


admin application 을 삭제하고자 한다면, 사용자는 일단 application 을 administrator 에서 해제 설정(앞서 행한 활성화를 무효화 해야 한다는 뜻)을 해야 한다.

Policies

In an enterprise setting, it's often the case that employee devices must adhere to a strict set of policies that govern the use of the device. The Device Administration API supports the policies listed in Table 1. Note that the Device Administration API currently only supports passwords for screen lock:


기업 설정에서, 직원의 기기가 기기의 사용을 제어하는 정책을 설정해야 하는 것은 흔한 경우이다. Device Administration API 는 아래의 표에 적힌 정책들을 지원한다.
현재로써는 Device Administration API 는 screen lock 을 위한 password 만을 제공한다 :

Table 1. Policies supported by the Device Administration API.
PolicyDescription
Password enabled Requires that devices ask for PIN or passwords.


기기가 PIN(숫자로만 이루어진 비밀번호) 나 password 를 요구하도록 한다.
Minimum password length Set the required number of characters for the password. For example, you can require PIN or passwords to have at least six characters.


password 의 최소 길이를 설정 한다. 예를 들어, 당신은 최소 6자 이상의 PIN 이나 password 를 요구 할 수 있다.
Alphanumeric password required Requires that passwords have a combination of letters and numbers. They may include symbolic characters.


password 가 숫자와 글자의 조합으로 이루어지도록 한다. 특수 문자도 포함될 수 있다.
Maximum failed password attempts Specifies how many times a user can enter the wrong password before the device wipes its data. The Device Administration API also allows administrators to remotely reset the device to factory defaults. This secures data in case the device is lost or stolen.


device 가 데이터를 지워 버리기 전에 몇회까지 틀린 password 의 입력을 허용할 것인지 설정한다. Device Administration API 는 또한 administrator 가 원격으로 기기를 출하 직후 상태로 reset 할 수 있는 기능을 제공한다. 이는 기기를 잃어버렸거나 도둑 맞은 경우 보안을 제공할 수 있다.
Maximum inactivity time lock Sets the length of time since the user last touched the screen or pressed a button before the device locks the screen. When this happens, users need to enter their PIN or passwords again before they can use their devices and access data. The value can be between 1 and 60 minutes.


사용자가 마지막으로 화면을 터치하거나 button 을 누른 후 얼마나 많은 시간이 지난 후 screen 을 lock 할지를 설정 할 수 있다. 해당 시간이 지나면, 사용자는 그들의 기기를 다시 사용하기 위해 PIN 이나 password 를 입력해야 한다. 값은 1분에서 60분까지 설정 가능하다.

Other features

In addition to supporting the policies listed in the above table, the Device Administration API lets you do the following:
  • Prompt user to set a new password.
  • Lock device immediately.
  • Wipe the device's data (that is, restore the device to its factory defaults).

위의 표에서 설명한 정책들 외에도, Device Administration API 는 다음과 같은 정책을 제공한다 :
  • 사용자가 새로운 password 를 설정하도록 요구.
  • device 를 즉각 Lock 시킨다.
  • device 의 데이터를 삭제(이는, 기기를 출하 직후의 상태로 되돌린다).

Sample Application

The examples used in this document are based on the Device Administration API sample, which is included in the SDK samples. For information on downloading and installing the SDK samples, see Getting the Samples. Here is the complete code for the sample.


이 문서에서 사용하는 예시는 SDK sample 에 포함된 Device Administration API sample 에 기초한다. SDK sample 의 다운로드와 설치를 위해서는 Getting the samples 문서를 참고 바란다. 여기 예제의 전체 코드가 있다.

The sample application offers a demo of device admin features. It presents users with a user interface that lets them enable the device admin application. Once they've enabled the application, they can use the buttons in the user interface to do the following:


예제 application 은 device admin 기능의 demo 를 제공한다. 그것은 사용자들이 admin application 을 활성화 할 수 있는 UI 를 제공한다. 한번 사용자가 이 application 을 활성화 하면, 그들은 다음의 기능을 사용하기 위해 버튼을 사용 할 수 있다 :

  • Set password quality.
  • Specify the minimum length for the user's password.
  • Set the password. If the password does not conform to the specified policies, the system returns an error.
  • Set how many failed password attempts can occur before the device is wiped (that is, restored to factory settings).
  • Set the maximum amount of inactive time that can elapse before the device locks.
  • Make the device lock immediately.
  • Wipe the device's data (that is, restore factory settings).

  • password 제한 설정.
  • 사용자 password 의 최소 길이 설정.
  • password 설정. 만약 해당 password 가 제시된 정책을 따르지 않을 경우, system 은 에러를 냄.
  • 얼마나 많은 password 실패가 반복될 때 기기의 데이터를 삭제할지(즉, 출하 직후 환경으로 복구됨).
  • 기기를 lock 하기 전 얼마나 많은 시간을 유지할 것인가 설정.
  • 즉시 기기를 lock.
  • 기기의 데이터 삭제(출하 직후 환경으로 복구)


Figure 1. Screenshot of the Sample Application

Developing a Device Administration Application

System administrators can use the Device Administration API to write an application that enforces remote/local device security policy enforcement. This section summarizes the steps involved in creating a device administration application.


System administrator 는 remote/local 기기 보안 정책 강제를 할 수 있는 application 의 개발을 위해 Device Administration API 를 사용 할 수 있다. 이 section 은 device administration application 을 개발하기 위한 단계를 요약, 정리해 본다.

Creating the manifest

manifest 만들기


To use the Device Administration API, the application's manifest must include the following:

Device Administration API 를 사용하기 위해서, application 의 manifest 는 다음을 포함해야 한다 :
  • 다음을 포함하는, DeviceAdminReceiver 의 subclass.
    • BIND_DEVICE_ADMIN 권한.
    • manifest 에 intent filter 로 선언, ACTION_DEVICE_ADMIN_ENABLE intent 를 받을 수 있어야함.
  • 사용하는 보안 정책을 metadata 로 선언.

Here is an excerpt from the Device Administration sample manifest:


Device Administration sample 의 manifest 로부터 다음을 참고하라 :

<activity android:name=".app.DeviceAdminSample$Controller"
          android:label="@string/activity_sample_device_admin">
    <intent-filter>
        <action android:name="android.intent.action.MAIN" />
        <category android:name="android.intent.category.SAMPLE_CODE" />
    </intent-filter>
</activity>
<receiver android:name=".app.DeviceAdminSample"
          android:label="@string/sample_device_admin"
          android:description="@string/sample_device_admin_description"
          android:permission="android.permission.BIND_DEVICE_ADMIN">
    <meta-data android:name="android.app.device_admin"
               android:resource="@xml/device_admin_sample" />
    <intent-filter>
        <action android:name="android.app.action.DEVICE_ADMIN_ENABLED" />
    </intent-filter>
</receiver>
Note that:


다음을 참고하라 :

  • The activity in the sample application is an Activity subclass called Controller. The syntax ".app.DeviceAdminSample$Controller" indicates that Controller is an inner class that is nested inside the DeviceAdminSample class. Note that an Activity does not need to be an inner class; it just is in this example.
  • The following attributes refer to string resources that for the sample application reside in ApiDemos/res/values/strings.xml. For more information about resources, see Application Resources.
    • android:label="@string/activity_sample_device_admin" refers to the user-readable label for the activity.
    • android:label="@string/sample_device_admin" refers to the user-readable label for the permission.
    • android:description="@string/sample_device_admin_description" refers to the user-readable description of the permission. A descripton is typically longer and more informative than a label.
  • android:permission="android.permission.BIND_DEVICE_ADMIN" is a permission that a DeviceAdminReceiver subclass must have, to ensure that only the system can interact with the receiver (no application can be granted this permission). This prevents other applications from abusing your device admin app.
  • android.app.action.DEVICE_ADMIN_ENABLED is the the primary action that a DeviceAdminReceiver subclass must handle to be allowed to manage a device. This is set to the receiver when the user enables the device admin app. Your code typically handles this in onEnabled(). To be supported, the receiver must also require the BIND_DEVICE_ADMIN permission so that other applications cannot abuse it.
  • When a user enables the device admin application, that gives the receiver permission to perform actions in response to the broadcast of particular system events. When suitable event arises, the application can impose a policy. For example, if the user attempts to set a new password that doesn't meet the policy requirements, the application can prompt the user to pick a different password that does meet the requirements.
  • android:resource="@xml/device_admin_sample" declares the security policies used in metadata. The metadata provides additional information specific to the device administrator, as parsed by the DeviceAdminInfo class. Here are the contents of device_admin_sample.xml:

  • 예제 application 에서 사용된 activity 는 Controller 라는 이름의, Activity 의 subclass 이다. ".app.DeviceAdminSample$Controller" 라는 문법은 Controller 가 DeviceAdminSample class 의 nested class 임을 알린다. Activity 가 굳이 inner class 일 필요는 없음을 참고하라; 단지 이 예제에서의 상황일 뿐이다.
  • 다음의 속성들은 ApiDemos/res/values/string.xml 에 포함된, 예제 application 의 문자열 resource 를 가리킨다.
    • android:label="@string/activity_sample_device_admin" 은 사용자가 읽을 수 있는, activity 의 lable 을 가리킨다.
    • android:label="@string/sample_device_admin" 은 사용자가 읽을 수 있는, permission 의 lable 을 가리킨다.
    • android:description="@string/sample_device_admin_description" 은 사용자가 읽을 수 있는, permission 의 설명을 가리킨다. 설명은 일반적으로 label 보다 길고, 알아 보기 쉽다.
  • android:permission="android.permission.BIND_DEVICE_ADMIN" 은 system 만이 이 receiver 와 상호 동작 한다는(어떤 application 도 이 permission 을 얻을 수 없다), DeviceAdminReceiver subclass 가 반드시 가져야 하는 권한이다. 이것은 다른 application 이 당신의 device admin app 을 방해하지 못하게 한다.
  • android.app.action.DEVICE_ADMIN_ENABLED 는 DeviceAdminReceiver subclass 가 기기를 관리 하기 위해 반드시 받아야 하는 action 이다. 이것은 사용자가 device admin app 을 활성화 시킬 때 receiver 에게 전달된다. 당신은 코드 상으로 이를 onEnabled() 에서 처리 하면 된다. receiver 는 또한, 다른 application 이 이를 악용하지 못하도록 BIND_DEVICE_ADMIN 권한을 요청 해야 한다.
  • 사용자가 device admin application 을 활성화 할 때, receiver 는 개별적인 system event broadcast 에 대해 반응을 할 수 있는 권한을 얻는다. 그러한 event 가 발생할 때, application 은 정책을 부과 할 수 있다. 예를 들어, 사용자가 현재 보안 정책을 지키지 않는 새로운 password 를 설정한다면 application 은 사용자가 현재 보안 정책을 지키는 다른 password 를 설정하도록 할 수 있다.
  • android:resource="@xml/device_admin_sample" 은 metadata 로 사용되는 보안 정책을 기술한다. metadata 는 DeviceAdminInfo class 에 의해 분석되는, device administrator 에 의해 사용되는 추가적인 정보를 제공한다.

<device-admin xmlns:android="http://schemas.android.com/apk/res/android">
  <uses-policies>
    <limit-password />
    <watch-login />
    <reset-password />
    <force-lock />
    <wipe-data />
  </uses-policies>
</device-admin>
In designing your device administration application, you don't need to include all of the policies, just the ones that are relevant for your app.


당신의 device administration application 을 설계함에 있어서, 모든 정책을 metadata 에 포함할 필요는 없다. 당신의 app 에서 사용할 정책만을 기술하면 된다.

For more discussion of the manifest file, see the Android Developers Guide.


manifest file 에 대한 보다 많은 정보를 위해선, Adnroid Developers Guide 를 참고하라.


Implementing the code

The Device Administration API includes the following classes:
DeviceAdminReceiver
Base class for implementing a device administration component. This class provides a convenience for interpreting the raw intent actions that are sent by the system. Your Device Administration application must include a DeviceAdminReceiver subclass.
DevicePolicyManager
A class for managing policies enforced on a device. Most clients of this class must have published a DeviceAdminReceiver that the user has currently enabled. The DevicePolicyManager manages policies for one or more DeviceAdminReceiver instances
DeviceAdminInfo
This class is used to specify metadata for a device administrator component.
These classes provide the foundation for a fully functional device administration application. The rest of this section describes how you use the DeviceAdminReceiver and DevicePolicyManager APIs to write a device admin application.

Device Administration API 는 다음의 class 들을 포함한다 :
DeviceAdminReceiver
  • device administration component 를 구현하기 위한 Base class. 이 class 는 system 으로부터 받는 raw intent action 에 쉽게 반응 할 수 있도록 해준다. 당신의 Device Administration application 은 DeviceAdminReceiver 의 subclass 를 포함해야 한다.


DevicePolicyManager
  • 기기에서 강제되는 정책들을 관리하기 위한 class. 이 클래스의 대부분의 client 들은 사용자가 현재 활성화 한 DeviceAdminReceiver 를 배포해야 한다. DevicePolicyManager 는 하나 또는 그 이상의 DeviceAdminReceiver instance 들을 위한 정책을 관리한다.


DeviceAdminInfo
  • device administrator component 의 metadata 를 기술하는데 사용된다.

이 class 들은 전체 device administration application 을 위한 토대를 제공한다.
이 section 의 다음 부분들은 DeviceAdminReceiver 와 DevicePolicyManager 를 device admin application 을 개발하기 위해 어떻게 사용하는지 기술한다.


Subclassing DeviceAdminReceiver

To create a device admin application, you must subclass DeviceAdminReceiver. The DeviceAdminReceiver class consists of a series of callbacks that are triggered when particular events occur.


device admin application 을 개발하기 위해, 당신은 DeviceAdminReceiver 의 subclass 를 만들어야 한다. DeviceAdminReceiver class 는 몇몇 event 가 일어날 때마다 호출되는 callback 함수들을 가지고 있다.

In its DeviceAdminReceiver subclass, the sample application simply displays a Toast notification in response to particular events. For example:


DeviceAdminReceiver 의 subclass 에서, 예제 application 은 간단히 각각의 event 에 응답해서 Toast notification 만 표시한다. 예를 들면 :

public class DeviceAdminSample extends DeviceAdminReceiver {
...
    @Override
    public void onEnabled(Context context, Intent intent) {
        showToast(context, "Sample Device Admin: enabled");
    }

    @Override
    public CharSequence onDisableRequested(Context context, Intent intent) {
        return "This is an optional message to warn the user about disabling.";
    }

    @Override
    public void onDisabled(Context context, Intent intent) {
        showToast(context, "Sample Device Admin: disabled");
    }

    @Override
    public void onPasswordChanged(Context context, Intent intent) {
        showToast(context, "Sample Device Admin: pw changed");
    }

    void showToast(Context context, CharSequence msg) {
        Toast.makeText(context, msg, Toast.LENGTH_SHORT).show();
    }
...
}

Enabling the application

One of the major events a device admin application has to handle is the user enabling the application. The user must explicitly enable the application for the policies to be enforced. If the user chooses not to enable the application it will still be present on the device, but its policies will not be enforced, and the user will not get any of the application's benefits.


device admin application 이 처리해야 하는 가장 중요한 event 중 하나는 사용자의 application 활성화 event 이다. 사용자는 보안 정책의 강제를 위해 application 을 명시적으로 활성화 해야 한다. 사용자가 application 을 활성화 하지 않기로 결정해도 해당 application 은 여전히 device 에 존재하지만, 정책을 강제 당하진 않으며, 사용자는 해당 application 으로부터 어떤 이득을 얻지 못할 것이다.

The process of enabling the application begins when the user performs an action that triggers the ACTION_ADD_DEVICE_ADMIN intent. In the sample application, this happens when the user clicks the Enable Admin button.


application 의 활성화는 사용자가 ACTION_ADD_DEVICE_ADMIN intent 를 발생시키면서 시작된다. 예제 application 에서, 이는 사용자가 Enable Admin 버튼을 클릭할 때 동작한다.

When the user clicks the Enable Admin button, the display changes to prompt the user to enable the device admin application, as shown in figure 2.


사용자가 Enable Admin 버튼을 클릭하면, figure 2 와 같은, 사용자의 device admin application 활성화를 위한 화면으로 이동한다.


Figure 2. Sample Application: Activating the Application
Below is the code that gets executed when the user clicks the Enable Admin button shown in figure 1.


아래는 사용자가 Enable Admin 버튼을 클릭했을 때 실행되는 code 다.

 private OnClickListener mEnableListener = new OnClickListener() {
    public void onClick(View v) {
        // Launch the activity to have the user enable our admin.
        Intent intent = new Intent(DevicePolicyManager.ACTION_ADD_DEVICE_ADMIN);
        intent.putExtra(DevicePolicyManager.EXTRA_DEVICE_ADMIN,
               mDeviceAdminSample);
        intent.putExtra(DevicePolicyManager.EXTRA_ADD_EXPLANATION,
               "Additional text explaining why this needs to be added.");
        startActivityForResult(intent, RESULT_ENABLE);
    }
};
...
// This code checks whether the device admin app was successfully enabled.
@Override
protected void onActivityResult(int requestCode, int resultCode, Intent data) {
    switch (requestCode) {
        case RESULT_ENABLE:
            if (resultCode == Activity.RESULT_OK) {
                Log.i("DeviceAdminSample", "Administration enabled!");
            } else {
                Log.i("DeviceAdminSample", "Administration enable FAILED!");
            }
            return;
    }
    super.onActivityResult(requestCode, resultCode, data);
}
The line intent.putExtra(DevicePolicyManager.EXTRA_DEVICE_ADMIN, mDeviceAdminSample) states that mDeviceAdminSample (which is a DeviceAdminReceiver component) is the target policy. This line invokes the user interface shown in figure 2, which guides users through adding the device administrator to the system (or allows them to reject it).


intent.putExtra(DevicePolicyManager.EXTRA_DEVICE_ADMIN, mDeviceAdminSample) 은 mDeviceAdminSample(DeviceAdminReceiver component) 이 target policy 임을 가리킨다. 이 내용은 사용자가 사용자가 device administrator 를 system 에 추가하는(또는 이를 거부하는) figure 2 의 화면과 마주하도록 한다.

When the application needs to perform an operation that is contingent on the device admin application being enabled, it confirms that the application is active. To do this it uses the DevicePolicyManager method isAdminActive(). Notice that the DevicePolicyManager methodisAdminActive() takes a DeviceAdminReceiver component as its argument:


application 이 활성화된 device admin application 의 동작을 실행하고자 한다면, application 이 활성화 되어 있음을 확인해야 한다. 이를 위해 DevicePolicyManager 의 isAdminActive() 메소드를 사용 할 수 있다. DevicePolicyManager 의 isAdminActive() 메소드는 DeviceAdminReceiver component 를 그 인자로 사용함을 알아둬라 :

DevicePolicyManager mDPM;
...
boolean active = mDPM.isAdminActive(mDeviceAdminSample);
if (active) {
    // Admin app is active, so do some admin stuff
               ...
} else {
    // do something else
}

Managing policies

DevicePolicyManager is a public class for managing policies enforced on a device. DevicePolicyManager manages policies for one or more DeviceAdminReceiver instances.


DevicePolicyManager 는 기기에 강제된 정책을 관리하는 public class 이다.
DevicePolicyManager 는 하나 또는 이상의 DeviceAdminReceiver instance 를 위한 정책을 관리한다.

You get a handle to the DevicePolicyManager as follows:


당신은 다음과 같이 DevicePolicyManager 를 얻을 수 있다 :

DevicePolicyManager mDPM =
    (DevicePolicyManager)getSystemService(Context.DEVICE_POLICY_SERVICE);
This section describes how to use DevicePolicyManager to perform administrative tasks:

이 section 은 관리 업무를 위해 어떻게 DevicePolicyManager 를 사용하는지 기술한다 :
  • password 정책 설정
  • 기기 lock 설정
  • data 삭제 실행

Set password policies

DevicePolicyManager includes APIs for setting and enforcing the device password policy. In the Device Administration API, the password only applies to screen lock. This section describes common password-related tasks.


DevicePolicyManager 는 기기의 password 정책을 설정하고 강제할 수 있는 API 를 포함한다. Device Administration API 에서, password 는 screen lock 에만 적용된다. 이 section 에서는 일반적인 password 에 관계된 동작에 대해 기술한다.

Set a password for the device
This code displays a user interface prompting the user to set a password:


아래의 코드는 사용자에게 password 를 설정하도록 하는 화면을 나타나게 한다 :

Intent intent = new Intent(DevicePolicyManager.ACTION_SET_NEW_PASSWORD);
startActivity(intent);
Set the password quality
The password quality can be one of the following DevicePolicyManager constants:
PASSWORD_QUALITY_ALPHABETIC
The user must enter a password containing at least alphabetic (or other symbol) characters.
PASSWORD_QUALITY_ALPHANUMERIC
The user must enter a password containing at least both numeric and alphabetic (or other symbol) characters.
PASSWORD_QUALITY_NUMERIC
The user must enter a password containing at least numeric characters.
PASSWORD_QUALITY_SOMETHING
The policy requires some kind of password, but doesn't care what it is.
PASSWORD_QUALITY_UNSPECIFIED
The policy has no requirements for the password.


password quality 는 아래의 DevicePolicyManager class 의 상수 중 하나가 될 수 있다 :
PASSWORD_QUALITY_ALPHABETIC
사용자는 문자(또는 특수문자)를 포함하는 password 를 설정 해야 한다.
PASSWORD_QUALITY_ALPHANUMERIC
사용자는 숫자와 문자(또는 특수문자)가 혼합된 password 를 설정 해야 한다.
PASSWORD_QUALITY_NUMERIC
사용자는 숫자로 이루어진 password 를 설정 해야 한다.
PASSWORD_QUALITY_SOMETHING
password 를 설정 해야 하지만, 그 구성을 제약하진 않는다.
PASSWORD_QUALITY_UNSPECIFIED
password 에 대한 강제 사항이 없다.


For example, this is how you would set the password policy to require an alphanumeric password:


예를 들어, 다음과 같이 문자+숫자 혼합 password 설정 정책을 설정 할 수 있다.

DevicePolicyManager mDPM;
ComponentName mDeviceAdminSample;
...
mDPM.setPasswordQuality(mDeviceAdminSample, DevicePolicyManager.PASSWORD_QUALITY_ALPHANUMERIC);
Set the minimum password length
You can specify that a password must be at least the specified minimum length. For example:


다음과 같이 password 의 최소 길이를 설정 할 수 있다 :

DevicePolicyManager mDPM;
ComponentName mDeviceAdminSample;
int pwLength;
...
mDPM.setPasswordMinimumLength(mDeviceAdminSample, pwLength);
Set maximum failed password attempts
You can set the maximum number of allowed failed password attempts before the device is wiped (that is, reset to factory settings). For example:


다음의 코드로 몇회의 password 입력 실패 시 기기의 data 삭제를 실행 할지 설정 할 수 있다 :

DevicePolicyManager mDPM;
ComponentName mDeviceAdminSample;
int maxFailedPw;
 ...
mDPM.setMaximumFailedPasswordsForWipe(mDeviceAdminSample, maxFailedPw);

Set device lock

You can set the maximum period of user inactivity that can occur before the device locks. For example:


다음의 코드로 얼마 동안 사용자 입력이 없을 때 기기를 lock 할 지 설정 할 수 있다 :

DevicePolicyManager mDPM;
ComponentName mDeviceAdminSample;
...
long timeMs = 1000L*Long.parseLong(mTimeout.getText().toString());
mDPM.setMaximumTimeToLock(mDeviceAdminSample, timeMs);
You can also programmatically tell the device to lock immediately:


또한 다음과 같이 당장 기기를 lock 하도록 할 수도 있다 :

DevicePolicyManager mDPM;
mDPM.lockNow();

Perform data wipe

You can use the DevicePolicyManager method wipeData() to reset the device to factory settings. This is useful if the device is lost or stolen. Often the decision to wipe the device is the result of certain conditions being met. For example, you can usesetMaximumFailedPasswordsForWipe() to state that a device should be wiped after a specific number of failed password attempts.


DevicePolicyManager 의 wipeData() 메소드를 이용해 factory setting 으로 기기를 복원 시킬 수 있다. 이것은 기기를 잃었거나 도난 당했을 때 유용할 것이다. 종종 데이터 삭제는 여러 조건이 복합되었을 때 결정된다. 예를 들어, setMaximumFailedPasswordsForWipe() 를 이용해 여러번 password 입력이 실패했을 때에 데이터 삭제를 진행한다.
You wipe data as follows:


데이터 삭제는 다음과 같이 실행할 수 있다 :

DevicePolicyManager mDPM;
mDPM.wipeData(0);
The wipeData() method takes as its parameter a bit mask of additional options. Currently the value must be 0.


wipeData() 메소드는 추가적인 옵션을 bit mask 로 해서 그 인자로 받는다.
현재로썬, 이 값은 반드시 0이어야 한다.
MIME-Type Description File Extension
application/acad AutoCAD drawing files dwg
application/clariscad ClarisCAD files ccad
application/dxf DXF (AutoCAD) dxf
application/msaccess Microsoft Access file mdb
application/msword Microsoft Word file doc
application/octet-stream Uninterpreted binary bin
application/pdf PDF (Adobe Acrobat) pdf
application/postscript Postscript, encapsulated Postscript, ai, ps, eps
Adobe Illustrator
application/rtf Rich Text Format file rtf rtf
application/vnd.ms-excel Microsoft Excel file xls
application/vnd.ms-powerpoint Microsoft PowerPoint file ppt
application/x-cdf Channel Definition Format file cdf
application/x-csh C-shell script csh csh
application/x-dvi TeX dvi dvi dvi
application/x-javascript Javascript source file js
application/x-latex LaTeX source file latex
application/x-mif FrameMaker MIF format mif
application/x-msexcel Microsoft Excel file xls
application/x-mspowerpoint Microsoft PowerPoint file ppt
application/x-tcl TCL script tcl
application/x-tex TeX source file tex
application/x-texinfo Texinfo (emacs) texinfo, texi
application/x-troff troff file t, tr, roff t, tr, roff
application/x-troff-man troff with MAN macros man
application/x-troff-me troff with ME macros me
application/x-troff-ms troff with MS macros ms
application/x-wais-source WAIS source file src
application/zip ZIP archive zip
audio/basic Basic audio (usually m-law) au, snd
audio/x-aiff AIFF audio aif, aiff, aifc
audio/x-wav Windows WAVE audio wav
image/gif GIF image gif
image/ief Image Exchange Format file ief
image/jpeg JPEG image jpeg, jpg jpe
image/tiff TIFF image tiff, tif
image/x-cmu-raster CMU Raster image ras
image/x-portable-anymap PBM Anymap image format pnm
image/x-portable-bitmap PBM Bitmap image format pbm
image/x-portable-graymap PBM Graymap image format pgm
image/x-portable-pixmap PBM Pixmap image format ppm
image/x-rgb RGB image format rgb
image/x-xbitmap X Bitmap image xbm
image/x-xpixmap X Pixmap image xpm
image/x-xwindowdump X Windows Dump (xwd) xwd
multipart/x-gzip GNU ZIP archive gzip
multipart/x-zip PKZIP archive zip
text/css Cascading style sheet css
text/html HTML file html, htm
text/plain Plain text txt
text/richtext MIME Rich Text rtx
text/tab-separated- values Text with tab-separated values tsv
text/xml XML document xml
text/x-setext Struct-Enhanced text etx
text/xsl XSL style sheet xsl
video/mpeg MPEG video mpeg, mpg, mpe
video/quicktime QuickTime video qt, mov
video/x-msvideo Microsoft Windows video avi
video/x-sgi-movie SGI movie player format movie


MIME 확장명

파일 확장명 

 application/x-silverlight-app  .xap
 application/manifest  .manifest 
 application/x-ms-application  .application 
 application/x-ms-xbap  .xbap
 application/octet-stream  .deploy
 application/vnd.ms-xpsdocument  .xps 
 application/xaml+xml  .xaml
 application/vnd.ms-cab-compressed  .cab
 application/vnd.openxmlformats-officedocument.wordprocessingml.document  .docx
 application/vnd.openxmlformats-officedocument.wordprocessingml.document  .docm
 application/vnd.openxmlformats-officedocument.presentationml.presentation  .pptx
 application/vnd.openxmlformats-officedocument.presentationml.presentation  .pptm
 application/vnd.openxmlformats-officedocument.spreadsheetml.sheet  .xlsx
 application/vnd.openxmlformats-officedocument.spreadsheetml.sheet  .xlsm
 application/msaccess  .accdb
 application/x-mspublisher  .pub
 image/svg+xml  .svg
 application/xhtml+xml  .xht
 application/xhtml+xml  .xhtml

After lot of struggling I was able to build 4.03 with following steps. This
worked for me and might not work for every one. I have ubuntu 11.10.

1. Install gcc4.4
apt-get gcc-4.4 and gcc-4.4-multilib and do

2. Use this command to build
make CC=gcc-4.4 CXX=g++-4.4

3. Get the extra binaries for the device if you are building for device
http://code.google.com/android/nexus/drivers.html#toroiml74k

4. Make following changes before build.

Edit following files from Android root folder as per the below diff

 vim build/core/combo/HOST_linux-x86.mk
 vim
external/chromium/testing/gtest/include/gtest/internal/gtest-param-util.h
 vim external/gtest/include/gtest/internal/gtest-param-util.h
 vim external/llvm/lib/Support/Mutex.cpp
 vim external/llvm/lib/Support/Signals.cpp
 vim external/llvm/lib/Support/Threading.cpp
 vim external/mesa3d/src/glsl/linker.cpp
 vim external/oprofile/libpp/format_output.h
 vim frameworks/compile/slang/Android.mk

Make following changes

project build/
diff --git a/core/combo/HOST_linux-x86.mk b/core/combo/HOST_linux-x86.mk
index 5ae4972..fc997f2 100644
--- a/core/combo/HOST_linux-x86.mk
+++ b/core/combo/HOST_linux-x86.mk
@@ -53,6 +53,8 @@ HOST_GLOBAL_CFLAGS += \
        -include $(call select-android-config-h,linux-x86)

 # Disable new longjmp in glibc 2.11 and later. See bug 2967937.
-HOST_GLOBAL_CFLAGS += -D_FORTIFY_SOURCE=0
+#HOST_GLOBAL_CFLAGS += -D_FORTIFY_SOURCE=0
+HOST_GLOBAL_CFLAGS += -U_FORTIFY_SOURCE -D_FORTIFY_SOURCE=0
+

 HOST_NO_UNDEFINED_LDFLAGS := -Wl,--no-undefined

project external/chromium/
diff --git a/testing/gtest/include/gtest/internal/gtest-param-util.h
b/testing/gtest/include/gtest/internal/gtest-param-util.h
index 0f7b331..0176a80 100644
--- a/testing/gtest/include/gtest/internal/gtest-param-util.h
+++ b/testing/gtest/include/gtest/internal/gtest-param-util.h
@@ -37,6 +37,7 @@
 #include <iterator>
 #include <utility>
 #include <vector>
+#include <cstddef>

 // scripts/fuse_gtest.py depends on gtest's own header being #included
 // *unconditionally*.  Therefore these #includes cannot be moved

project external/gtest/
diff --git a/include/gtest/internal/gtest-param-util.h
b/include/gtest/internal/gtest-param-util.h
index 5559ab4..1572064 100644
--- a/include/gtest/internal/gtest-param-util.h
+++ b/include/gtest/internal/gtest-param-util.h
@@ -33,7 +33,7 @@

 #ifndef GTEST_INCLUDE_GTEST_INTERNAL_GTEST_PARAM_UTIL_H_
 #define GTEST_INCLUDE_GTEST_INTERNAL_GTEST_PARAM_UTIL_H_
-
+#include <cstddef>
 #include <iterator>
 #include <utility>
 #include <vector>

project external/llvm/
diff --git a/lib/Support/Android.mk b/lib/Support/Android.mk
index 4a36e4a..f1978f5 100644
--- a/lib/Support/Android.mk
+++ b/lib/Support/Android.mk
@@ -102,3 +102,8 @@ LOCAL_MODULE_TAGS := optional

 include $(LLVM_DEVICE_BUILD_MK)
 include $(BUILD_STATIC_LIBRARY)
+
+
+
+
+
diff --git a/lib/Support/Mutex.cpp b/lib/Support/Mutex.cpp
index 8874e94..1a5be09 100644
--- a/lib/Support/Mutex.cpp
+++ b/lib/Support/Mutex.cpp
@@ -13,7 +13,8 @@

 #include "llvm/Config/config.h"
 #include "llvm/Support/Mutex.h"
-
+#undef ENABLE_THREADS
+#undef HAVE_PTHREAD_H
 //===----------------------------------------------------------------------===//
 //=== WARNING: Implementation here must contain only TRULY operating system
 //===          independent code.
diff --git a/lib/Support/Signals.cpp b/lib/Support/Signals.cpp
index a117893..2f9c412 100644
--- a/lib/Support/Signals.cpp
+++ b/lib/Support/Signals.cpp
@@ -18,6 +18,7 @@
 namespace llvm {
 using namespace sys;

+#undef HAVE_DLFCN_H
 //===----------------------------------------------------------------------===//
 //=== WARNING: Implementation here must contain only TRULY operating system
 //===          independent code.
diff --git a/lib/Support/Threading.cpp b/lib/Support/Threading.cpp
index 8f0bb93..24a45e4 100644
--- a/lib/Support/Threading.cpp
+++ b/lib/Support/Threading.cpp
@@ -17,6 +17,8 @@
 #include "llvm/Config/config.h"
 #include <cassert>

+#undef LLVM_MULTITHREADED
+
 using namespace llvm;

 static bool multithreaded_mode = false;

project external/mesa3d/
diff --git a/src/glsl/linker.cpp b/src/glsl/linker.cpp
index f8b6962..f31e5b5 100644
--- a/src/glsl/linker.cpp
+++ b/src/glsl/linker.cpp
@@ -67,6 +67,7 @@
 #include <cstdio>
 #include <cstdarg>
 #include <climits>
+#include <stddef.h>

 #include <pixelflinger2/pixelflinger2_interface.h>

@@ -1762,4 +1763,4 @@ done:
    }

    //hieralloc_free(mem_ctx);
-}
\ No newline at end of file
+}

project external/oprofile/
diff --git a/libpp/format_output.h b/libpp/format_output.h
index b6c4592..0423448 100644
--- a/libpp/format_output.h
+++ b/libpp/format_output.h
@@ -91,7 +91,8 @@ protected:
                symbol_entry const & symbol;
                sample_entry const & sample;
                size_t pclass;
-               mutable counts_t & counts;
+               //mutable counts_t & counts;
+               counts_t & counts;
                extra_images const & extra;
                double diff;
        };

project frameworks/base/
diff --git a/libs/utils/Android.mk b/libs/utils/Android.mk
index 831d9e3..b07b01c 100644
--- a/libs/utils/Android.mk
+++ b/libs/utils/Android.mk
@@ -61,7 +61,7 @@ LOCAL_SRC_FILES:= $(commonSources)

 LOCAL_MODULE:= libutils

-LOCAL_CFLAGS += -DLIBUTILS_NATIVE=1 $(TOOL_CFLAGS)
+LOCAL_CFLAGS += -DLIBUTILS_NATIVE=1 $(TOOL_CFLAGS)
 LOCAL_C_INCLUDES += external/zlib

 ifeq ($(HOST_OS),windows)

project frameworks/compile/slang/
diff --git a/Android.mk b/Android.mk
index a783ba9..d9fa88e 100644
--- a/Android.mk
+++ b/Android.mk
@@ -19,7 +19,9 @@ ifeq ($(TARGET_BUILD_APPS),)

 LOCAL_PATH := $(call my-dir)

-local_cflags_for_slang := -Wno-sign-promo -Wall -Wno-unused-parameter
-Werror
+//local_cflags_for_slang := -Wno-sign-promo -Wall -Wno-unused-parameter
-Werror
+local_cflags_for_slang := -Wno-sign-promo -Wall -Wno-unused-parameter
+
 ifneq ($(TARGET_BUILD_VARIANT),eng)
 local_cflags_for_slang += -D__DISABLE_ASSERTS
 endif

Hope this helps.

On Tue, Jan 17, 2012 at 2:15 PM, Jean-Baptiste Queru <j...@android.com>wrote:

+ Recent posts